
 Advanced Creators
BMW M4 G82Build Guide — Part 1: Background Information
Alpha Model AM02-0036 · Build by breakwong
1/24 Scale Full Detail Kit

Background Information
The BMW M4 is a version of the BMW 4 Series automobile developed by BMW's motorsport division, BMW M, that has been built since 2014. As part of the renumbering that splits the coupe and convertible variants of the 3 Series into the 4 Series, the M4 replaced those variants of the BMW M3. Upgrades over the standard BMW 4 Series include an upgraded engine, suspension, exhaust system, brakes and weight reduction measures including increased use of carbon fibre, such as on the roof of the car.

Technical Specifications
| Specification | Detail |
|---|---|
| Production | 2020-present |
| Designer | Anne Forschner |
| Engine | 3.0 L S58B30T0 twin-turbo I6 |
| Transmission | 6-speed ZF GS6-53BZ manual / 8-speed ZF 8HP automatic |
| Wheelbase | 2,857 mm (112.5 in) - coupe / convertible |
| Length | 4,794 mm (188.7 in) - coupe / convertible |
| Width | 1,887 mm (74.3 in) - coupe / convertible |
| Height | 1,394 mm (54.9 in) - coupe / 1,395 mm (54.9 in) - convertible |
Next: Unboxing & Preparation
Advanced Creators
BMW M4 G82 Build Guide — Part 2: Unboxing & Preparation
Alpha Model AM02-0036 · Build by breakwong
1/24 Scale Full Detail Kit
Unboxing
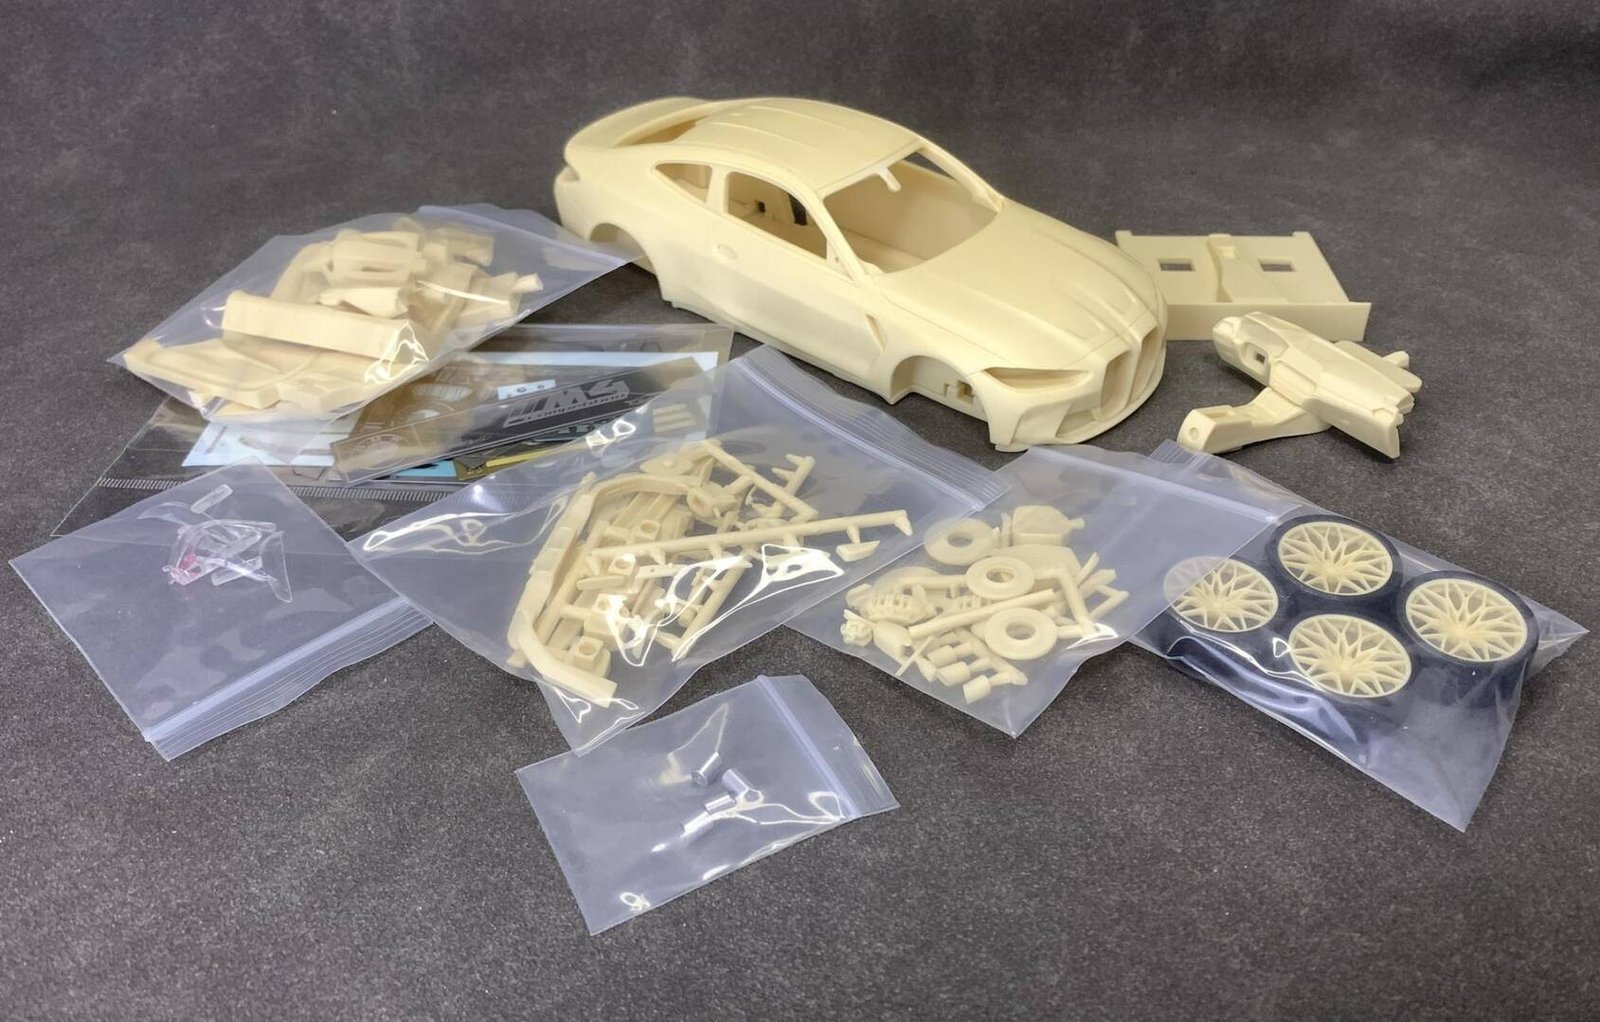
After opening the product package, take out all the parts bags and the car body. Since the product may be damaged during transportation through the logistics company, you must first check whether the parts are defective. The A-pillar of the car shell is more easily damaged, as well as brake calipers, wheel rims and other small parts. After confirming that the parts are not damaged, please check whether the etched sheet is bent and damaged and whether the water decal is stained. After confirming that all standard items are normal, you can start the preparation work.
The molding of this product is very precise. The lines of the body, interior details, wheels, etc. are all made according to the 1:1 scale of the real car. The roof is also given a carbon fiber sticker to simulate the material of the real car, and the size and shape of the sticker can fit perfectly on the model.
AlphaModel provides a wealth of etched sheets and decals on a large number of parts to improve the details of the model, including steering wheels, central consoles, instrument panels, brake discs, air intake grilles, etc., which are basically the same as real cars. In addition, the car windshield glass is made of ultra-thin and highly transparent PE transparent patch. The effect will be great after the production is completed.
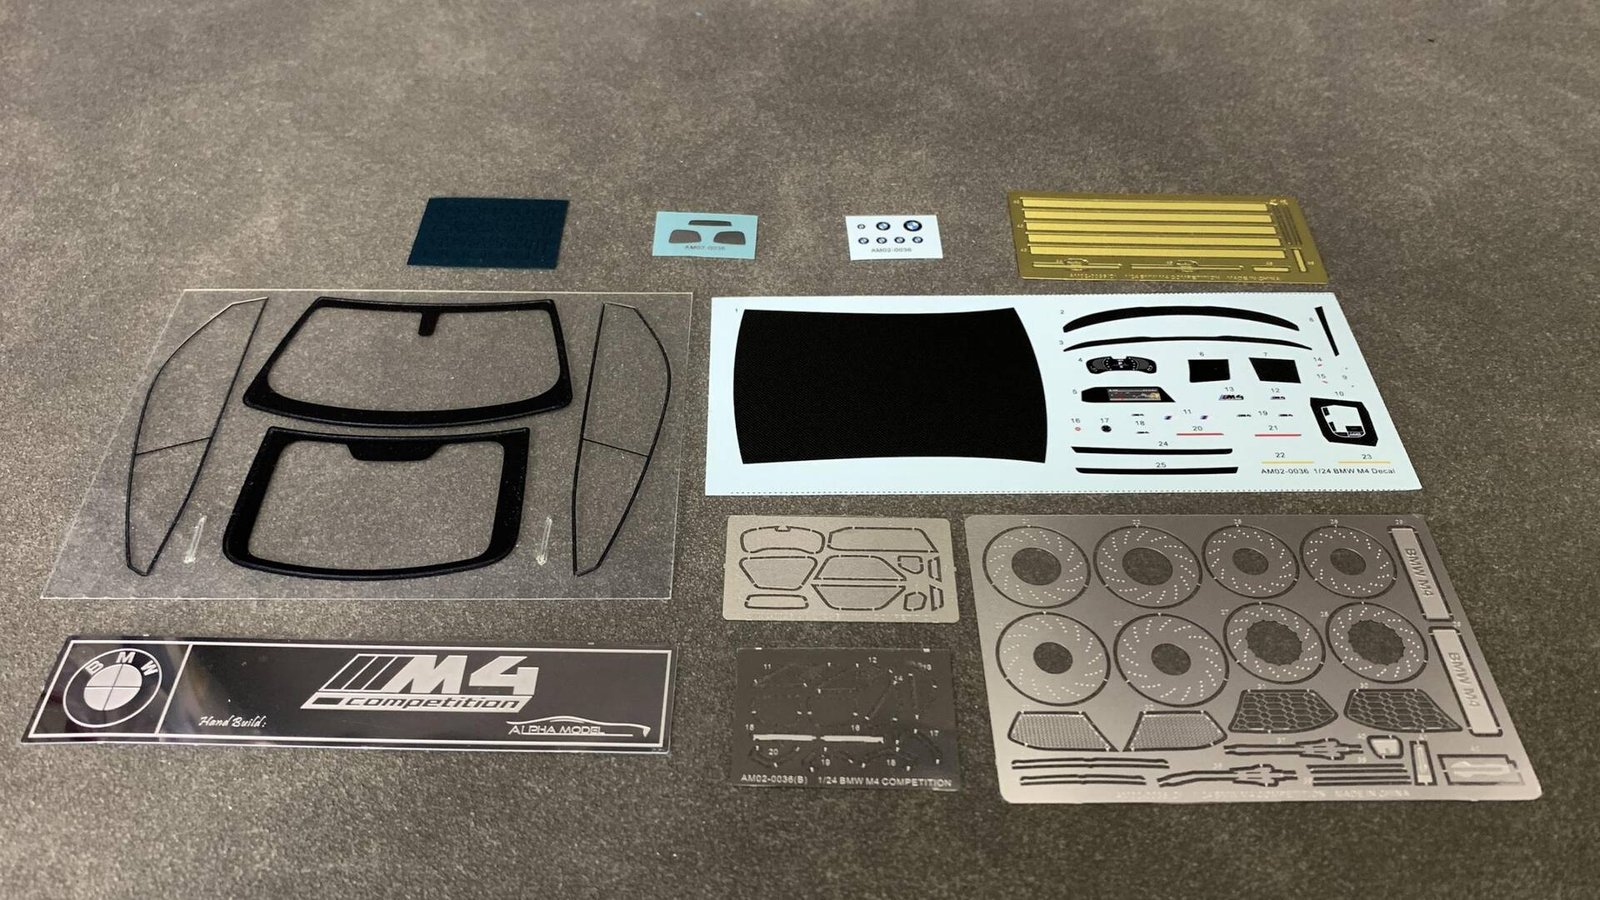
AlphaModel's products have precise mold opening, especially in the production technology of car casings. The car casings have precise shapes, smooth surfaces without burrs and shrinkage, deep engraved lines, and sharp edges. These features greatly reduce the difficulty of production and are very suitable for beginners.
This product not only has traditional brake discs, interior details and other details, but also has a complete engine for players to make. There are a large number of detailed pictures of real cars on the Internet for your reference. After the production is completed, you can see the engine through the rear engine cover window, giving full view of the engine.
Each car has its own unique color matching, and players can also color it according to their own preferences. Before production, you can refer to photos of the actual car and mark the color of each part on the product manual to facilitate later coloring.
Tools & Preparation
During the production process of the BMW M4 G82, we need to prepare some necessary tools in advance, such as: outline pen, paper sandpaper, sponge sandpaper, instant glue, tweezers, marking knife, pen knife, etching sheet bending pliers, etc. Having tools that are handy and feel good when making can help players create high-quality static models more easily.
- Outline pen
- Paper sandpaper
- Sponge sandpaper
- Instant glue
- Tweezers
- Marking knife
- Pen knife
- Etching sheet bending pliers
Use dish soap or other resin cleaning fluid to clean all the resin parts. Because there is a layer of grease release agent on the surface of the workpiece, if it is not cleaned and directly sprayed, problems such as fish eyes and lack of adhesion of the paint will cause discoloration. After cleaning, just let it dry.
Next: Car Body Treatment
Advanced Creators
BMW M4 G82 Build Guide — Part 3: Car Body Treatment
Alpha Model AM02-0036 · Build by breakwong
1/24 Scale Full Detail Kit
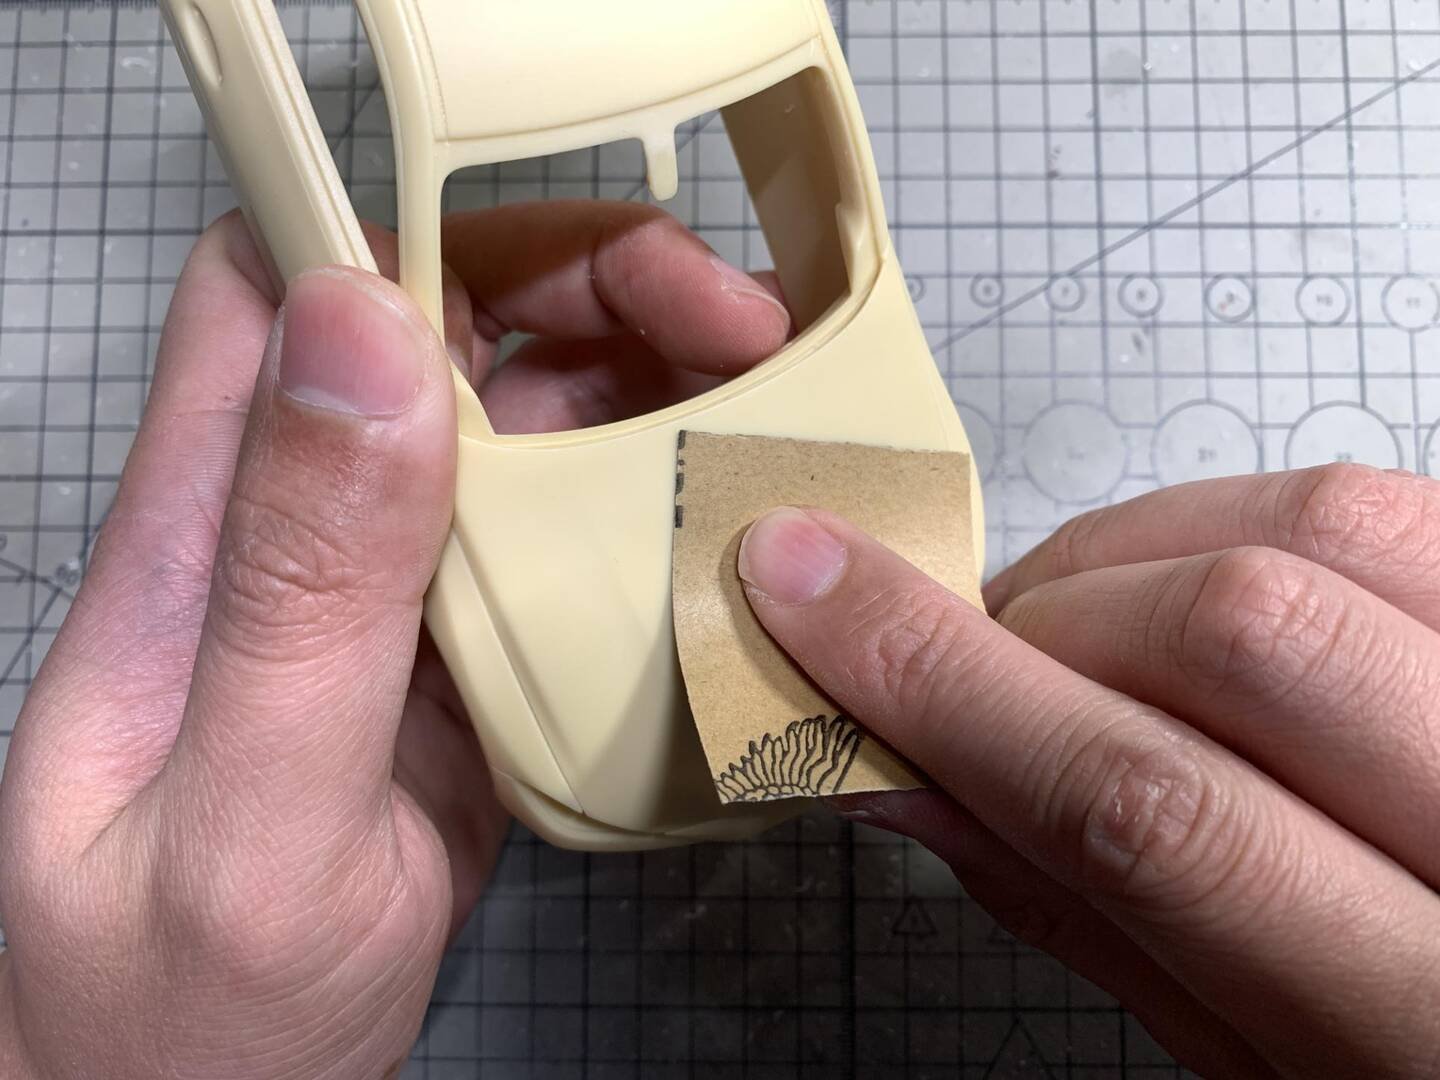
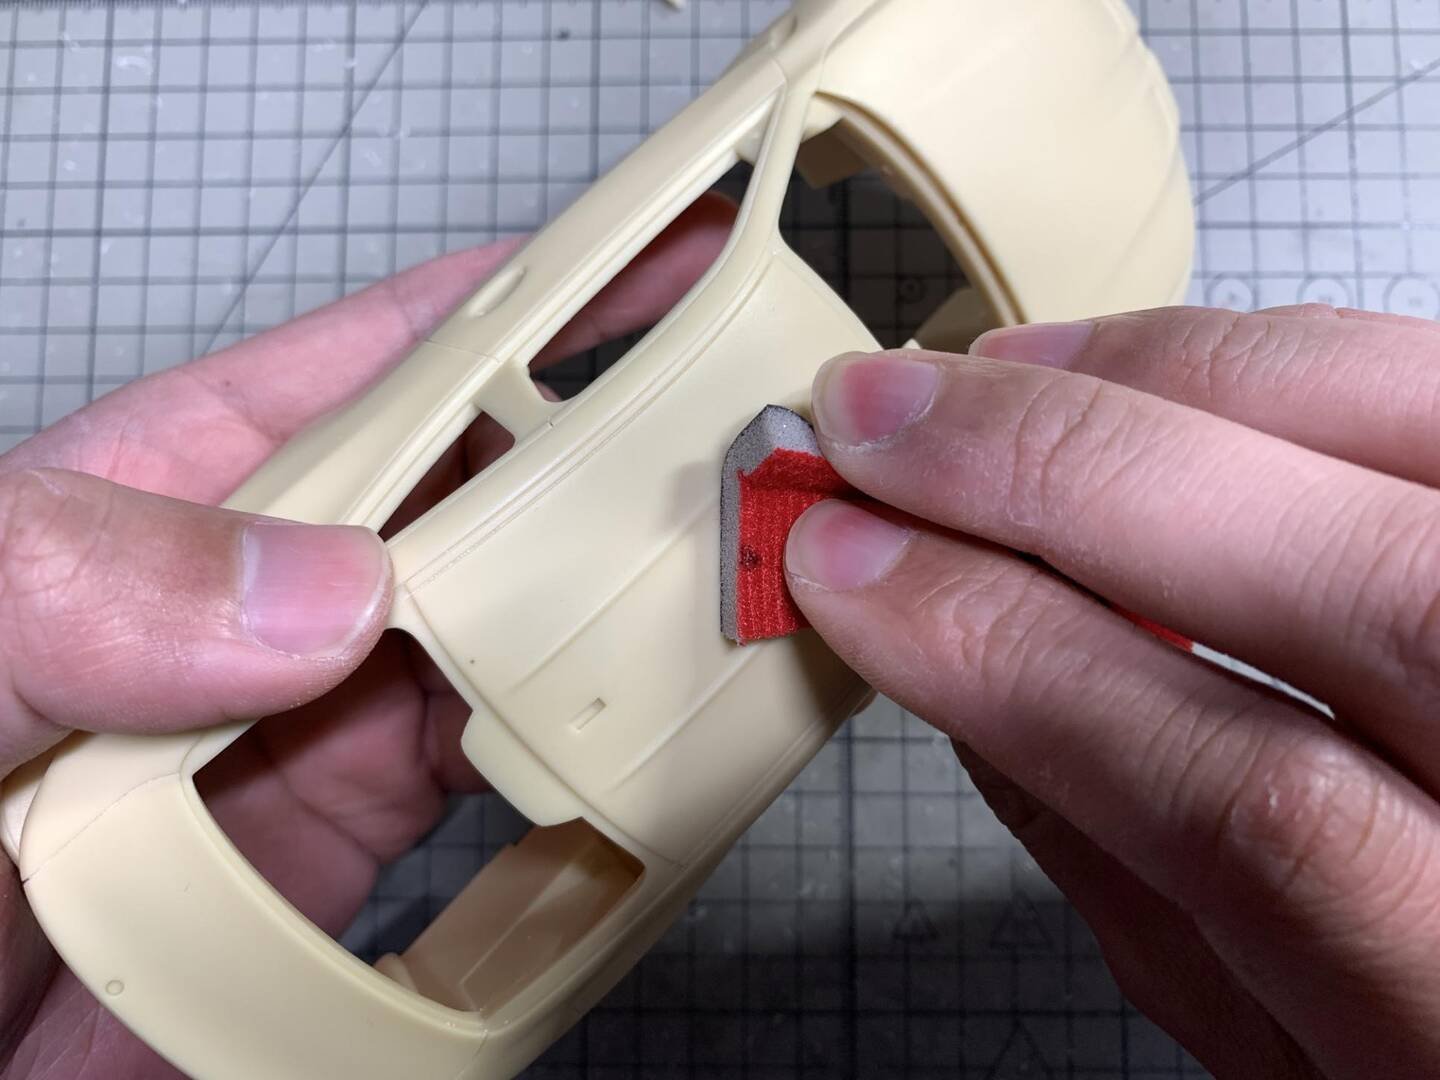
Car Body Treatment
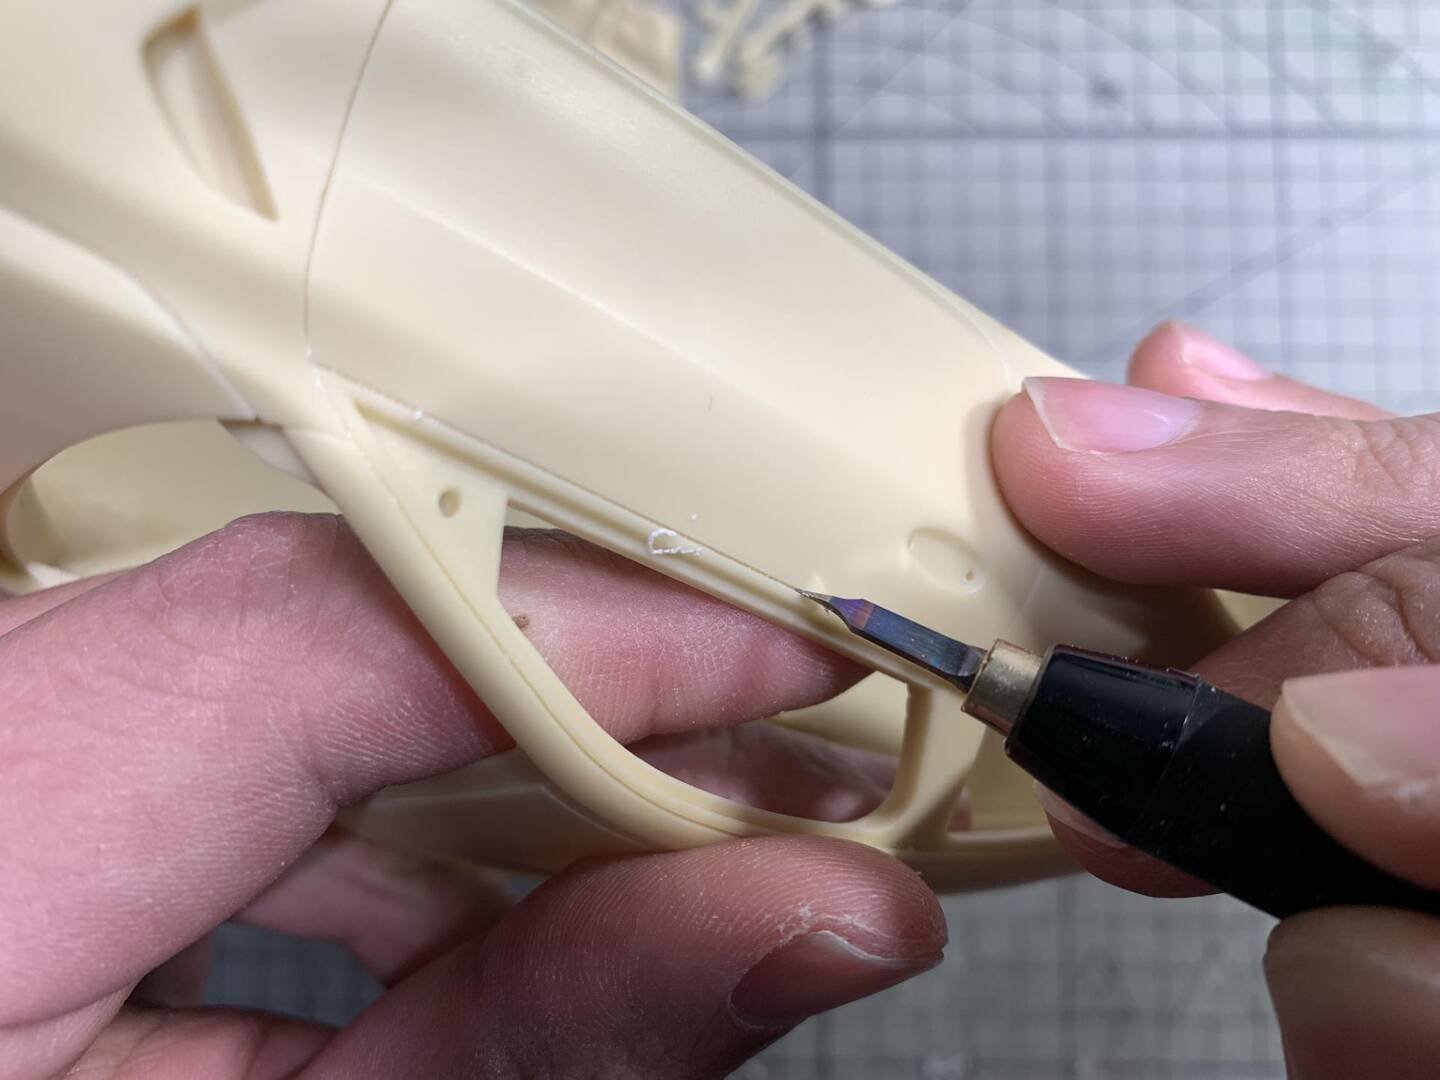
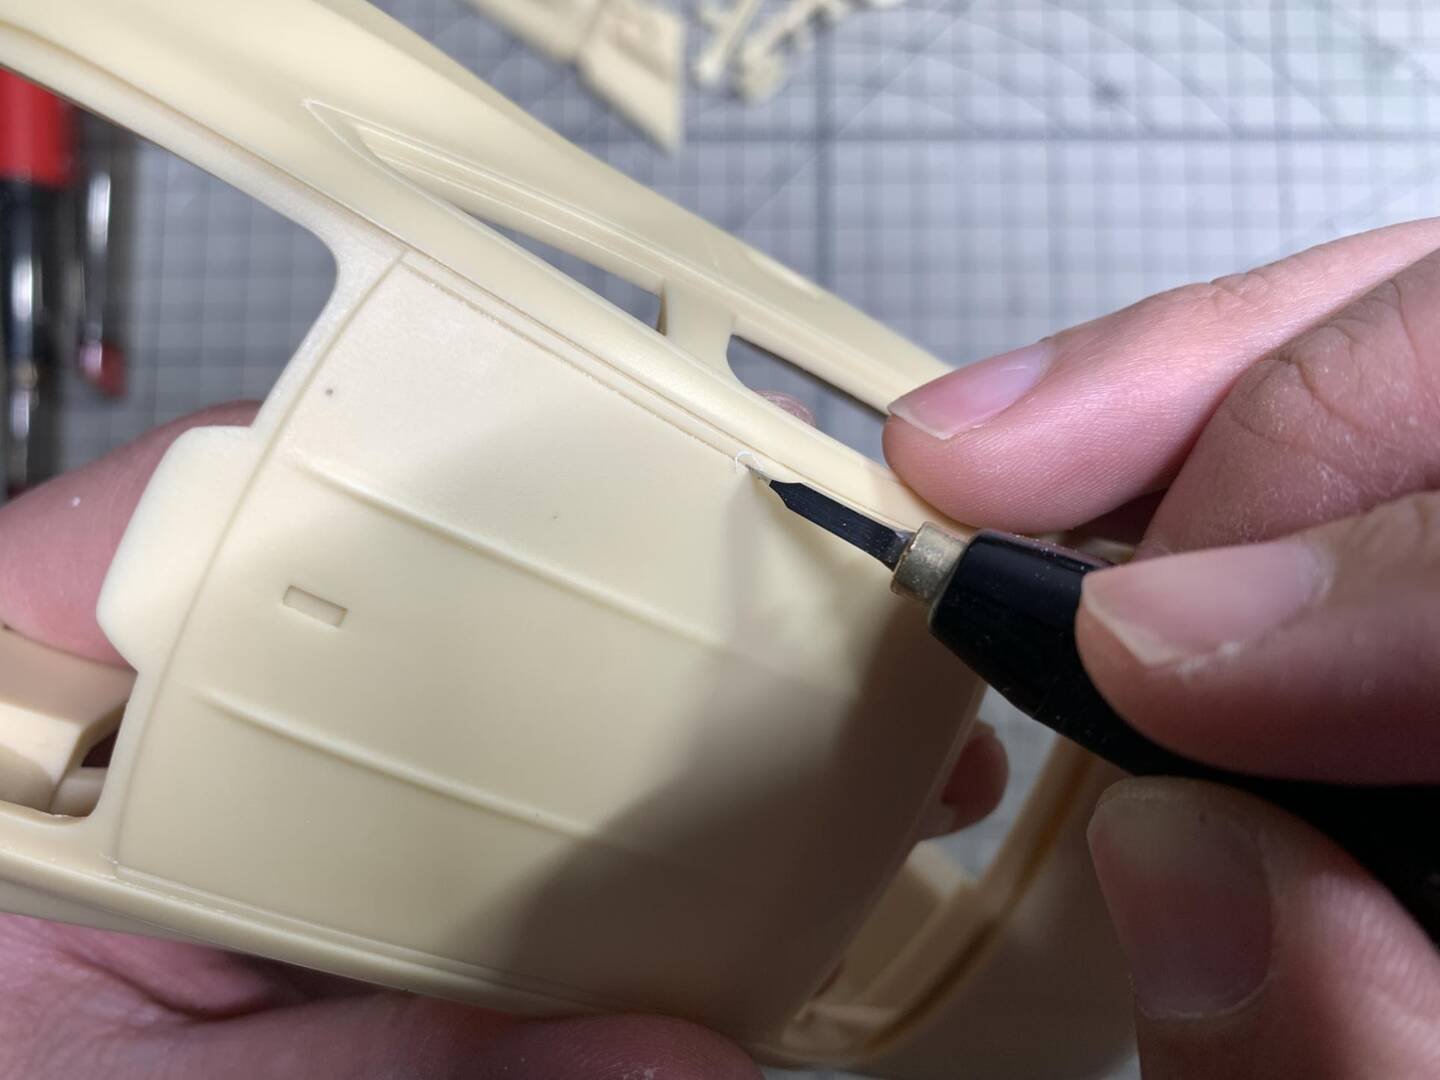
First, observe various parts of the car shell. Generally, there will be some unevenness at the bottom of the side skirts. You can first use sandpaper to polish and level it. After making sure there are no problems such as missing material, use a 0.15mm caliber scoring knife to deepen the panel lines. Although the engraved lines on the car shell itself are relatively clear, we need to manually deepen them again. This is to make them more three-dimensional after the production is completed. We can also consider not bleeding the lines and using natural shadows to show the texture of the engraved lines.
When carving, you need to pay attention to the intensity from light to heavy. First, gently draw 2 strokes along the engraving line, and then slowly apply pressure. At the arc position, you can use the elbow hook knife to deepen the engraving line. If there is no hook knife, when using a straight-edged scoring knife to deepen, do not carve out of bounds to avoid more trouble, and pay attention to the angle of the knife head — do not carve the curved score line into a straight line.
Sanding & Polishing
After adding the deep lines, first use No. 800 paper sandpaper to polish and level the entire car shell. This will increase the sharpness of the entire car. The position of the engraved lines will be more obvious and the position of the large flat surfaces will be smoother. In the later stage of painting, the effect will be better with varnish. During the polishing process, be careful to use light force on the arcs and protruding parts to avoid grinding away the complex details.
After leveling, use 1000 and 1500 grit sandpaper to sand off the thicker scratches, and then use 1500 and 2000 sponge sandpaper to polish it again. Use high-grit sandpaper to apply a little more force, which will make it easier to polish off the rough scratches. Only after the surface of the workpiece has been properly treated will the effect be better.
Safety Warning: Be careful to wear a gas mask during the polishing process. Resin dust is toxic, so pay attention to protection.
Next: Preassembly & Internal Components
Advanced Creators
BMW M4 G82 Build Guide — Part 4: Preassembly & Internal Components
Alpha Model AM02-0036 · Build by breakwong
1/24 Scale Full Detail Kit
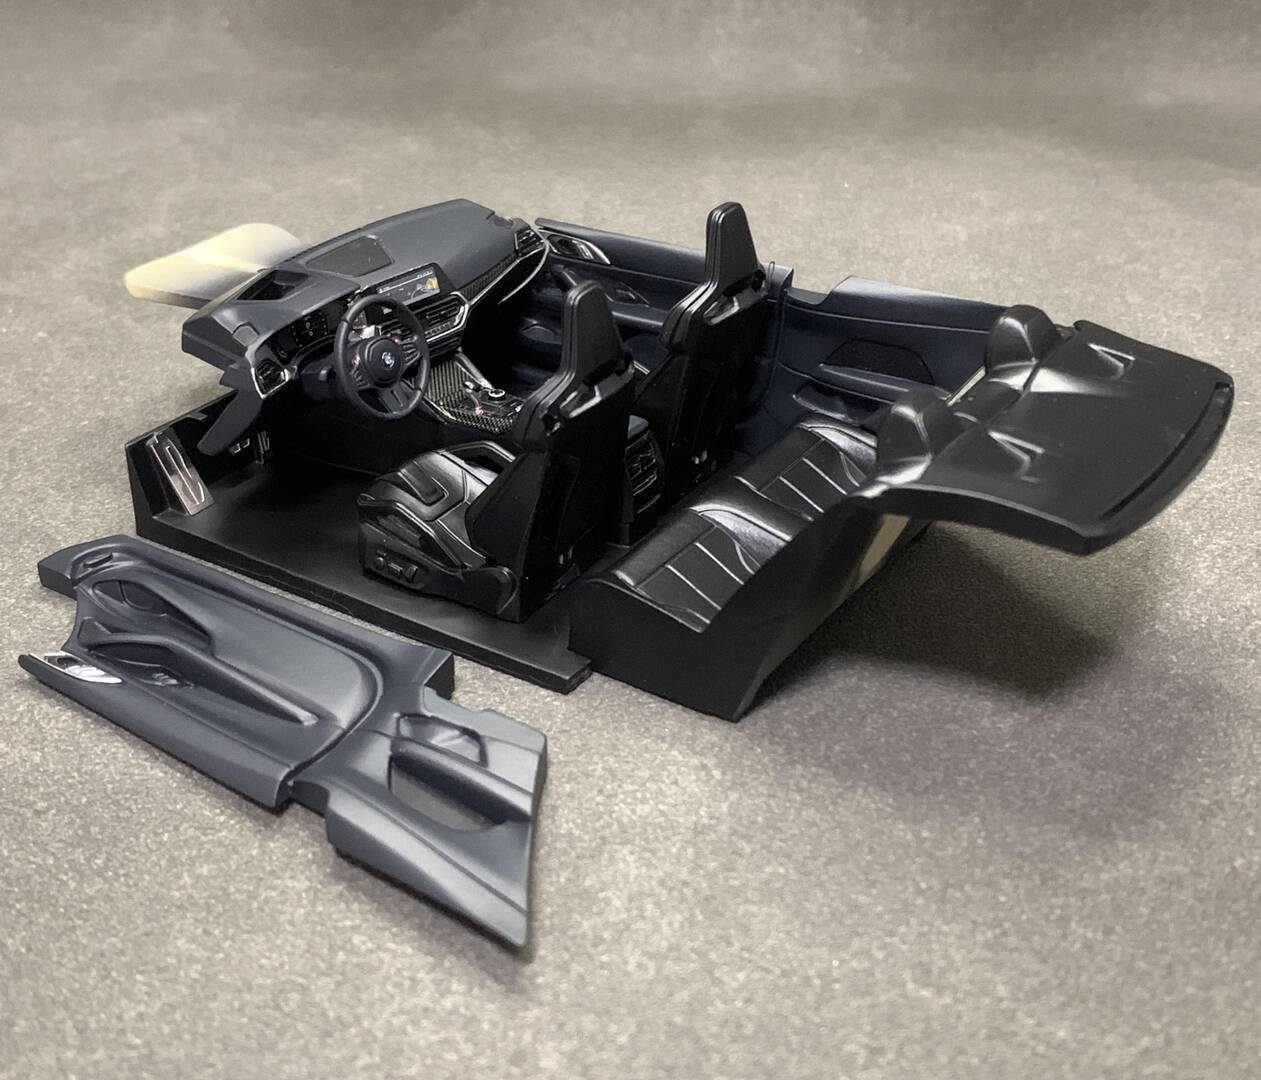
Preassembly
Use nozzle pliers to cut off the nozzle of the part bit by bit. Do not cut off the entire nozzle at once to avoid missing material. Assemble the polished parts according to the part number in the instruction manual. AlphaModel's mold opening is very precise, and every part can be assembled directly, with perfect fit and reasonable spout position. In addition, the dry assembly can also let players know the order of some parts during the assembly process, so that they will not install the wrong parts during the final assembly.
In the process of polishing the nozzle and the element assembly, be careful not to use excessive force to cause damage to some very small parts. The parts are easy to fall apart when clamped with tweezers. Parts that are not easy to clamp can be assembled with a dispensing pen. The adhesive used in the dry assembly can use blue butyl glue.
Painting & Color Reference
Referring to the interior pictures of the real car, you can determine the color of each component and choose the appropriate paint for spraying according to different colors and glosses. For example, if the center console is black, we can choose matte black (Gunze C33). The instrument panel and door interior panels are made of soft plastic black and gray — we can use matte black (Gunze C33) mixed with a little bit of white (Gunze C62). We also need to color-separate the silver lines of the instrument panel. After confirming the color of all parts, we can start painting.
For the surface of resin parts, we cannot use plastic-specific primer spray, which will cause the adhesion of the paint to decrease. Instead, we can choose to use Gunze SF287 as the primer. This primer will increase the adhesion of the paint and prevent it from peeling off.
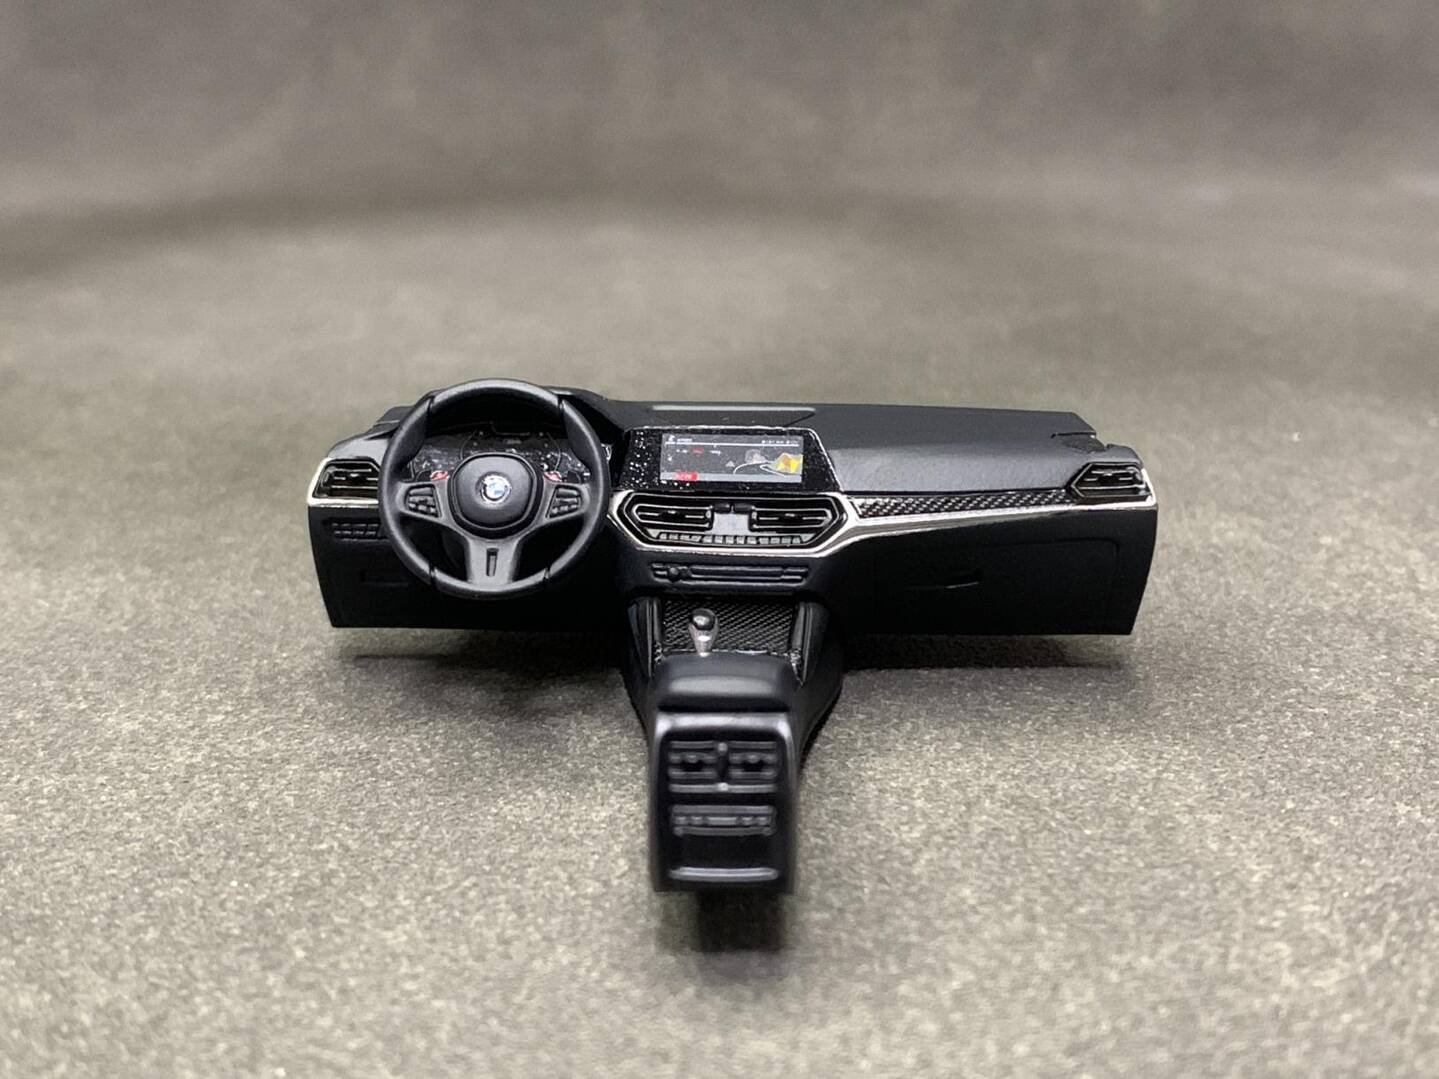
Internal Components
After completing the painting of all internal components, proceed with the detailed assembly of the engine, interior, and chassis parts according to the instruction manual. Take care to follow the correct assembly sequence and use appropriate adhesives for each type of joint.
Next: Body Shell
Advanced Creators
BMW M4 G82 Build Guide — Part 5: Body Shell
Alpha Model AM02-0036 · Build by breakwong
1/24 Scale Full Detail Kit
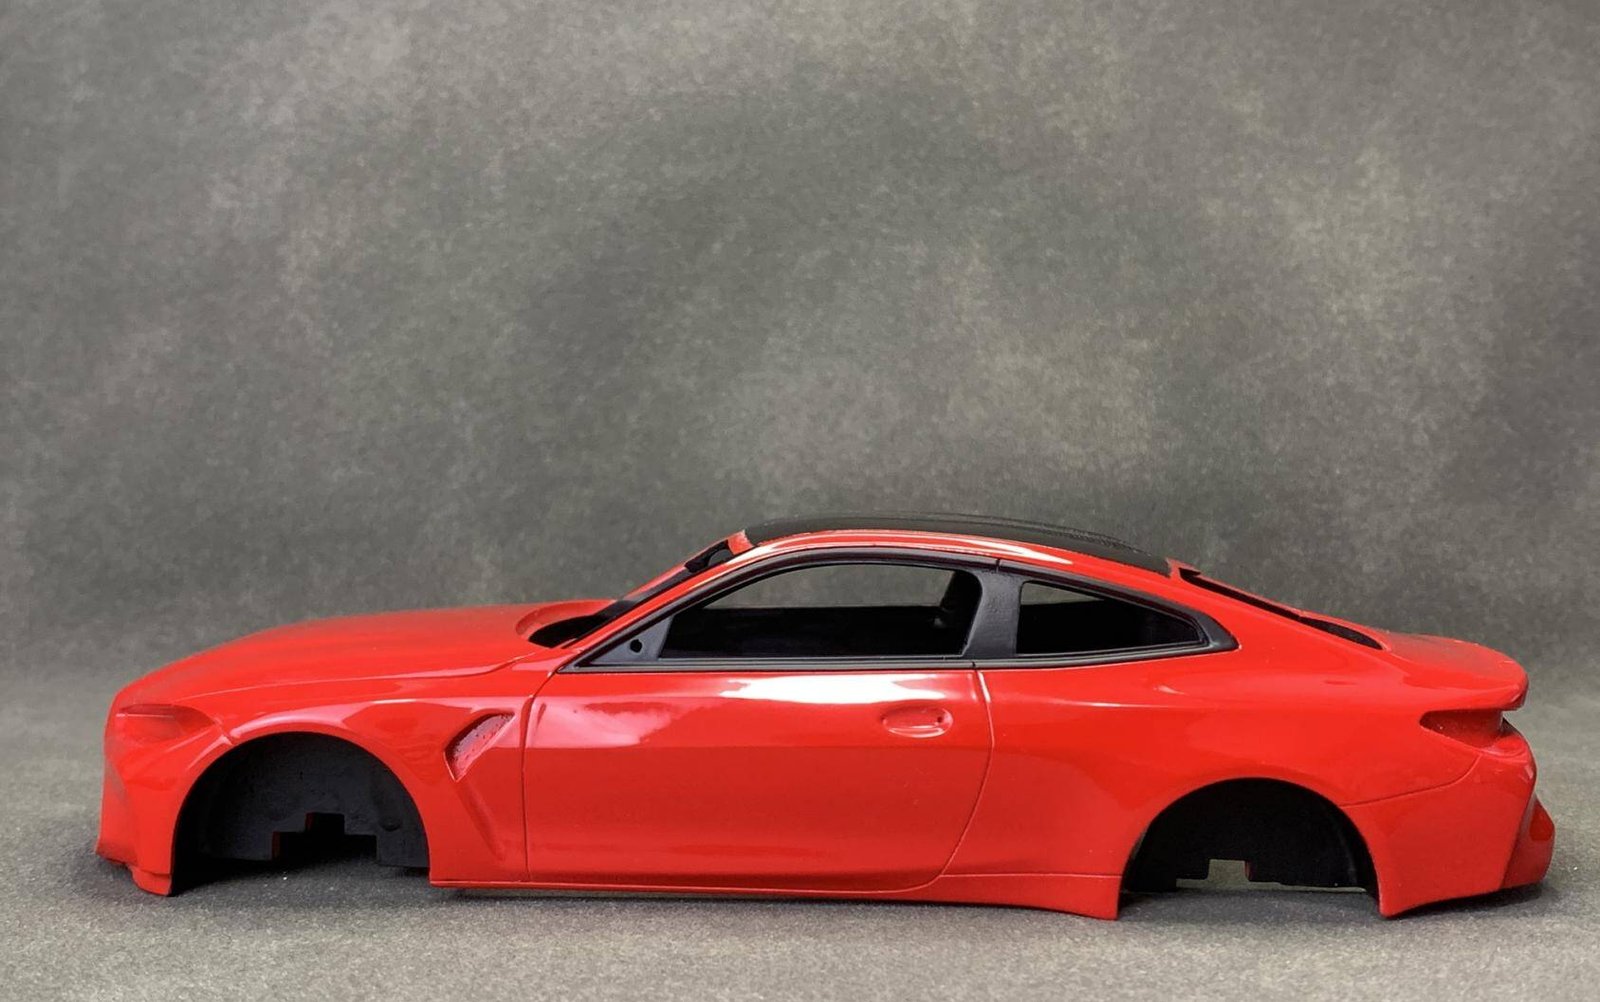
Body Shell
With the internal components completed and the car body properly treated, we now move on to the body shell painting and finishing process. The body shell has already been sanded and polished in the previous step, so we can proceed directly to priming and painting.
Apply the primer evenly across the entire body shell surface. Once the primer has fully cured, inspect the surface under good lighting for any remaining imperfections. If any are found, use fine-grit sandpaper to address them before proceeding to the color coat.
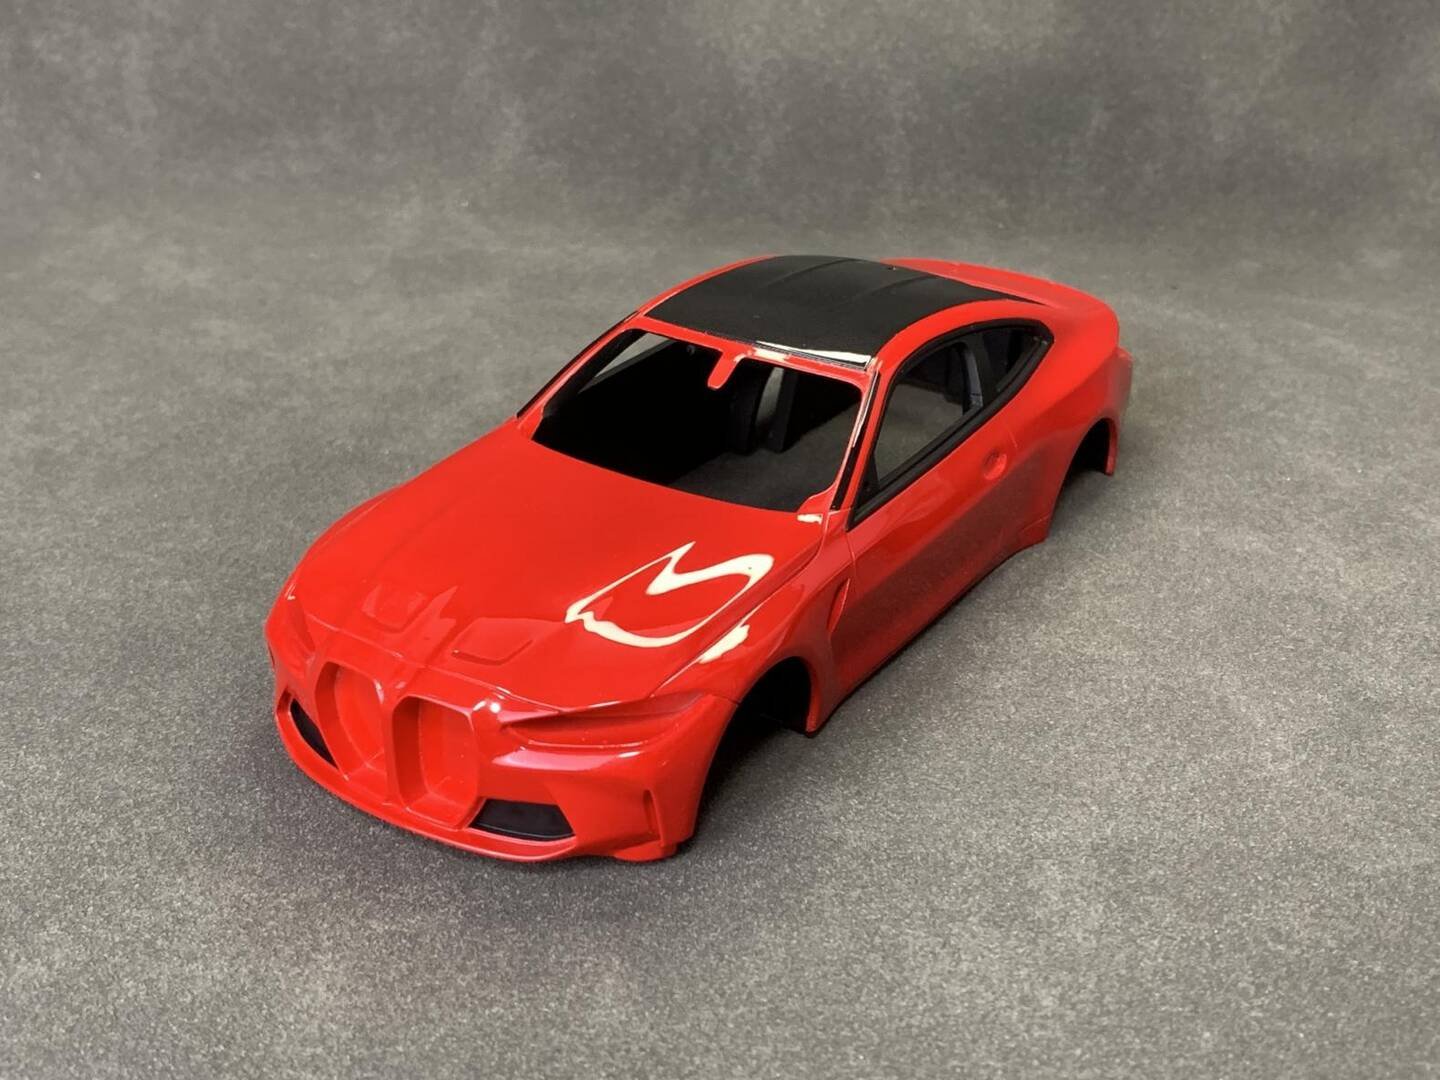
When applying the color coat, build up the paint in thin, even layers to achieve a smooth and consistent finish. Allow each layer to dry properly before applying the next. After the final color coat has cured, apply a clear varnish to protect the paint and enhance the depth and beauty of the finish.
Next: Wiper Production
Advanced Creators
BMW M4 G82 Build Guide — Part 6: Wiper Production
Alpha Model AM02-0036 · Build by breakwong
1/24 Scale Full Detail Kit
Wiper Production
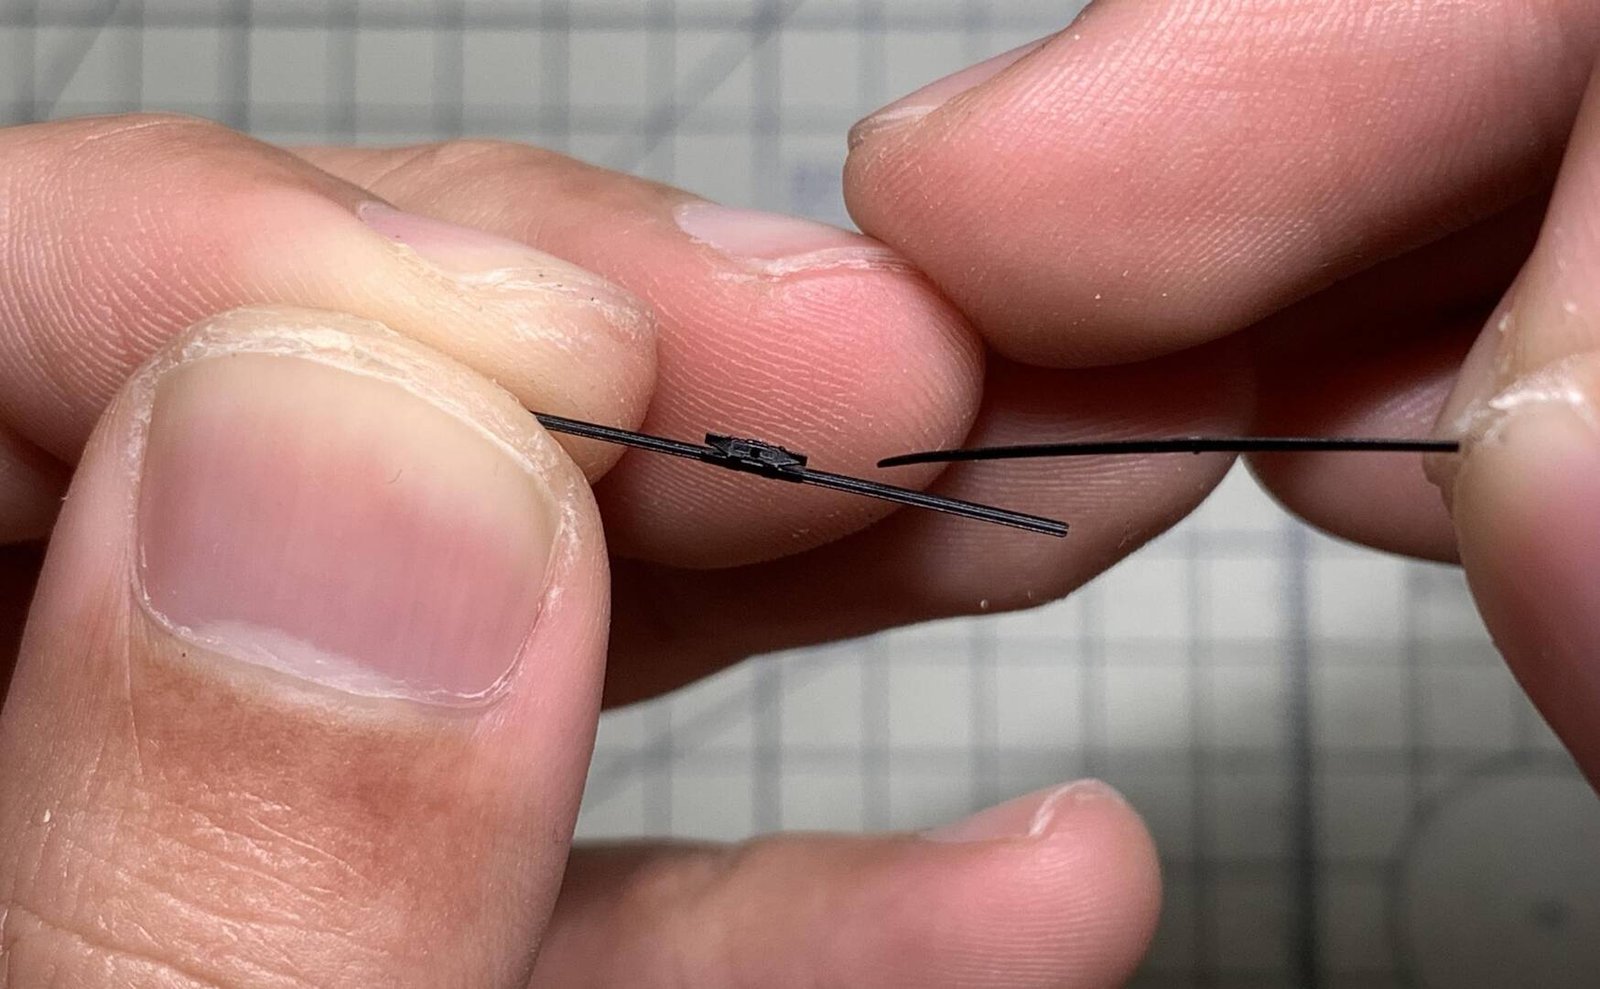
First make the swing arm and bend it 90 degrees according to the groove on the etched sheet. Be careful not to bend it in the wrong direction because the bending groove is thin. If you bend it too many times, it will cause breakage. Since the connected part of the swing arm and wiper is relatively small, you can use tweezers to hold it and bend it.
Bend the wiper bracket according to the groove, and bend the top of the bracket into a square opening.
Wiper Assembly
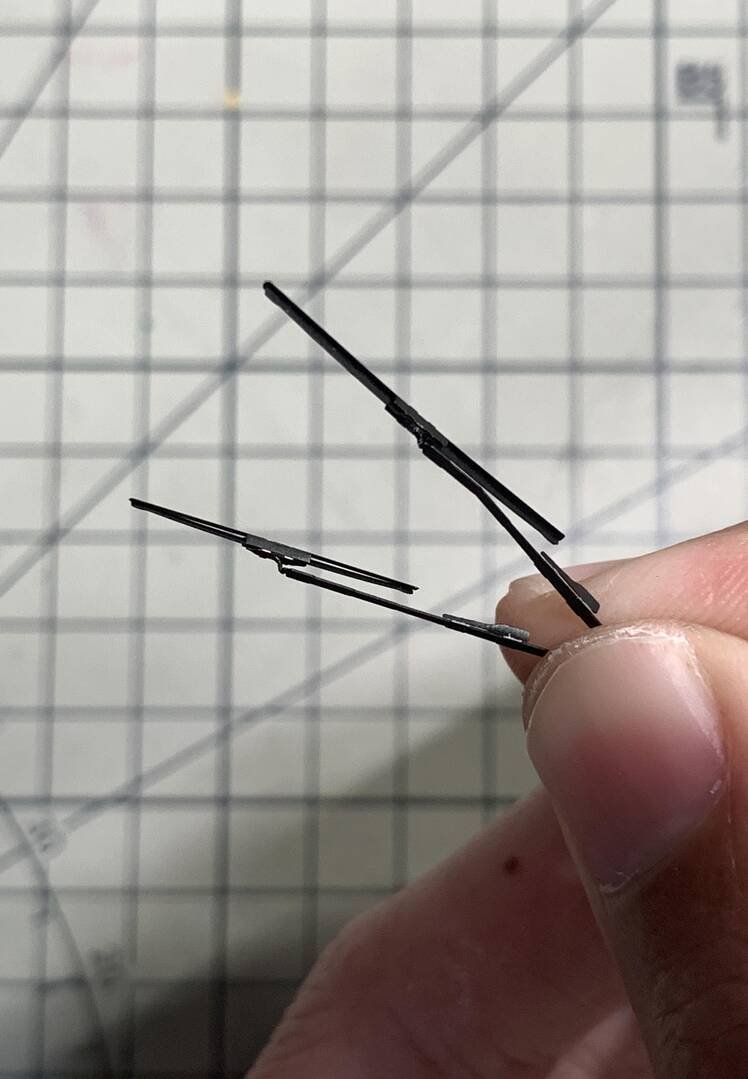
Pass the wiper blade through the square hole of the wiper bracket and fix it in the center. Pass the buckle of the swing arm head through the hole in the middle of the wiper bracket to complete the assembly.
Take extra care during this step as the etched parts are very delicate. Use fine tweezers and work under good lighting to ensure proper alignment of all components.
Next: Final Assembly, Completion & Exhibit
Advanced Creators
BMW M4 G82 Build Guide — Part 7: Final Assembly, Completion & Exhibit
Alpha Model AM02-0036 · Build by breakwong
1/24 Scale Full Detail Kit
Final Assembly
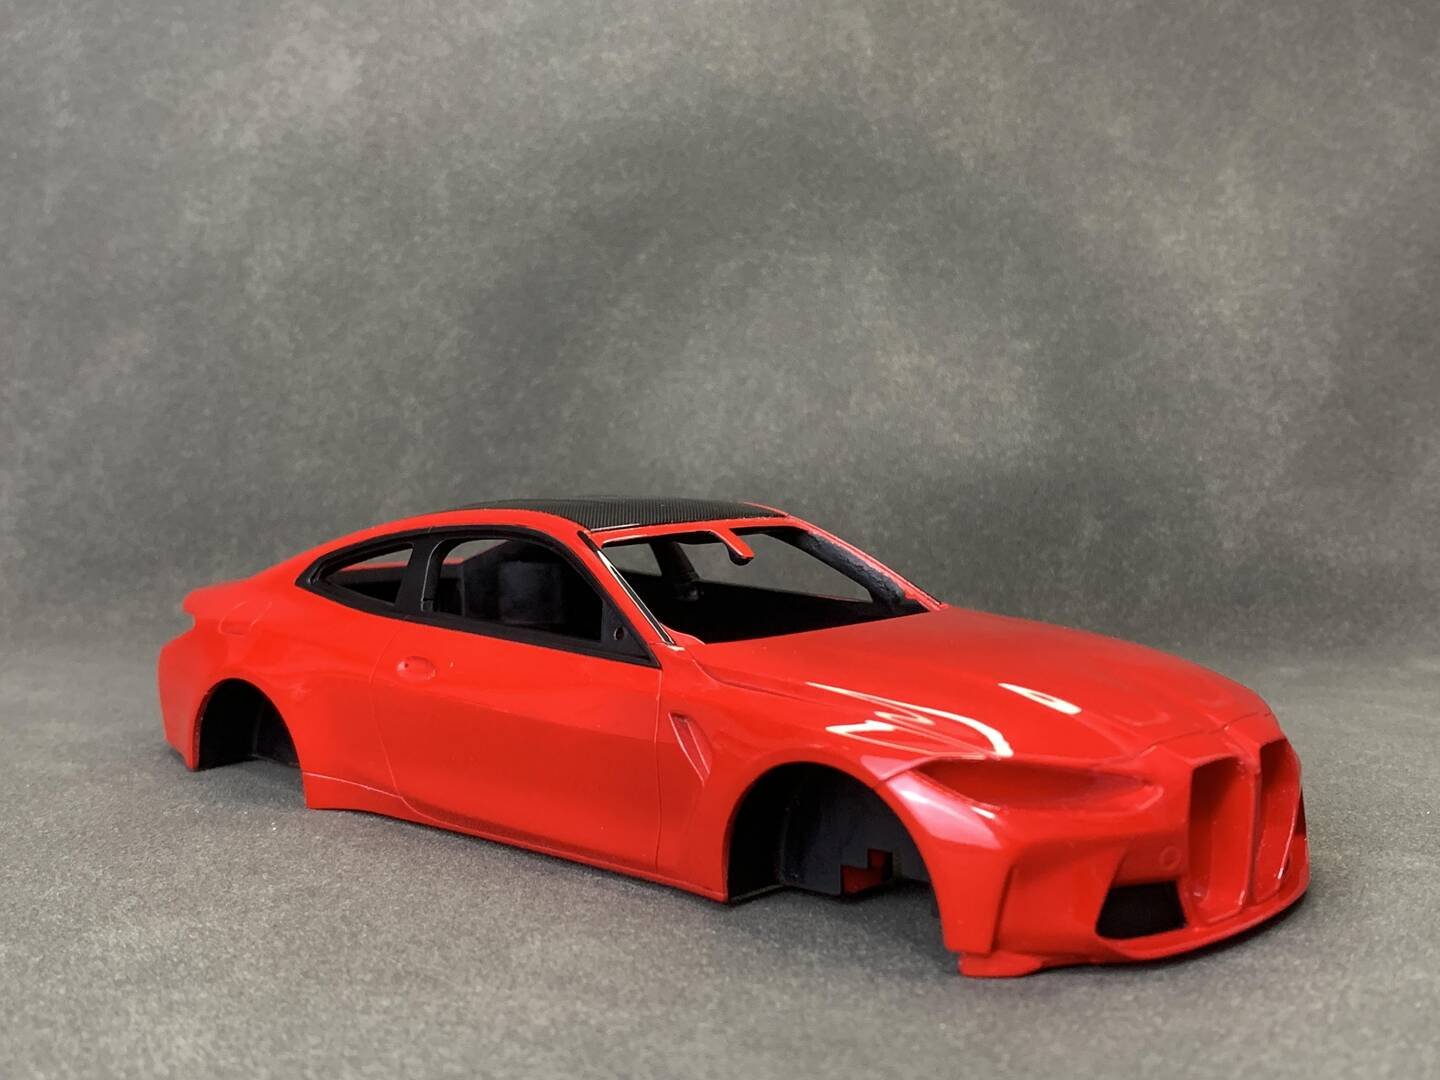
The air intake grille at the bottom of the front of the car needs to be compared in advance and bent at a small angle. AlphaModel is accurate in mold opening, and you only need to compare the slots. When dispensing glue, it is recommended to use jelly-like instant glue for bonding. Pay attention to the amount of glue control.
Because the headlights do not have black edges to cover the blemishes, the glue can use colorless and transparent UV glue. Even if there is a trace amount of glue overflow, it will not be visible. Wait for the position to be adjusted and then use the ultraviolet light to cure.
Taillight Transparent Red
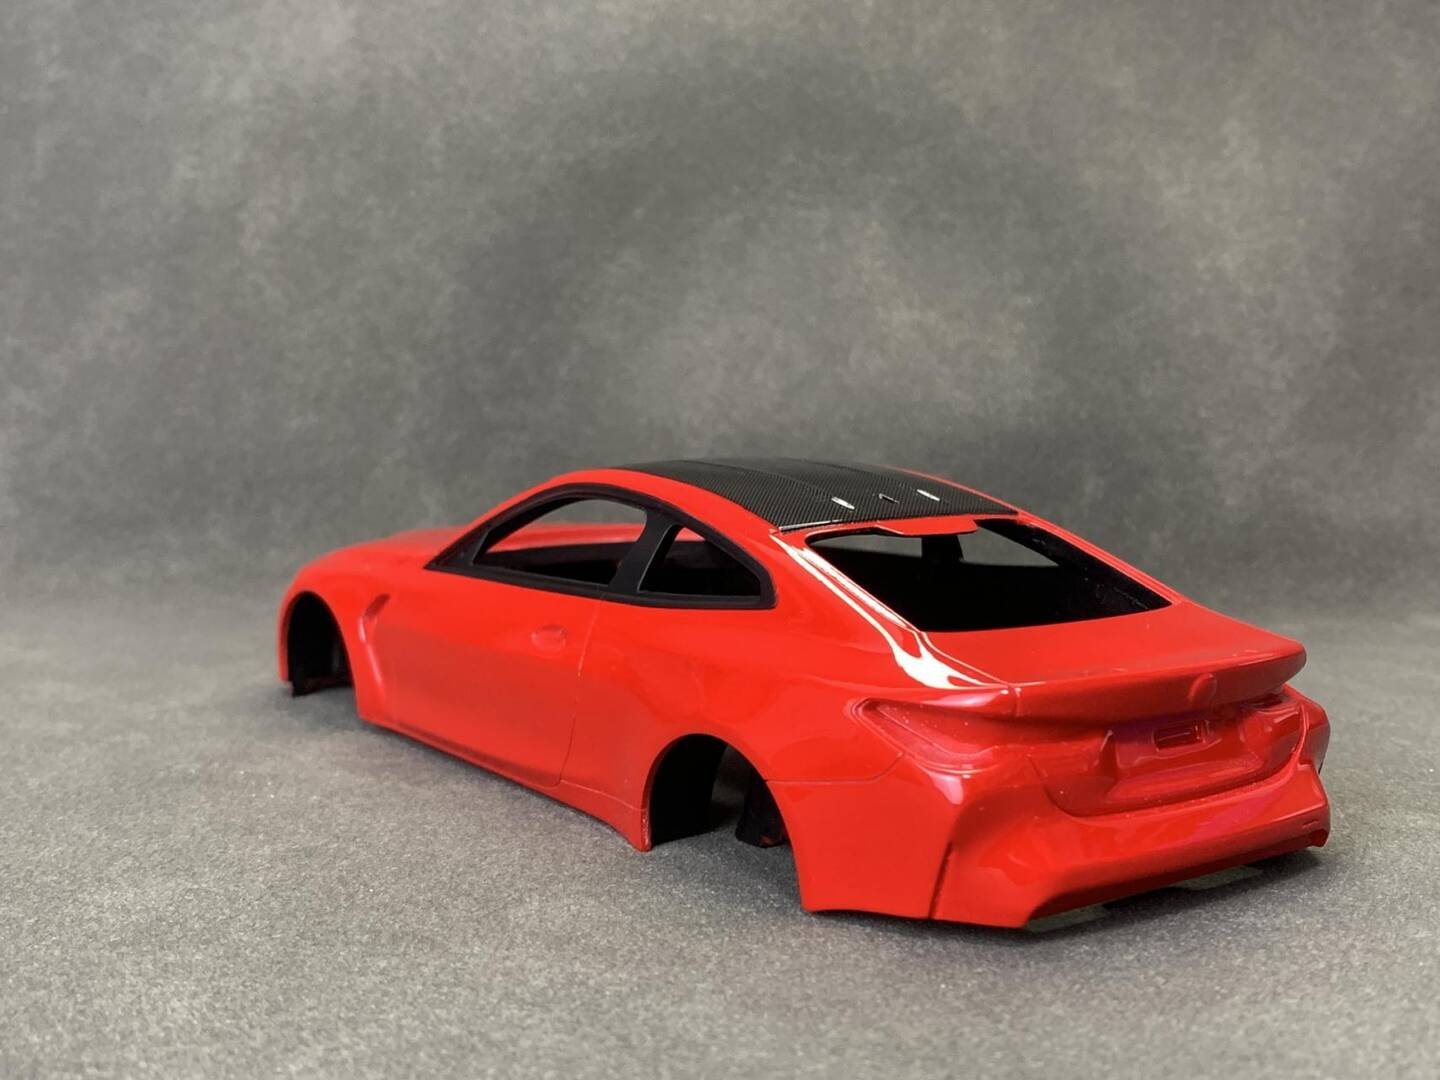
The transparent red covering of the taillight lampshade is the most difficult part of this product. You can stick the masking tape on the lamp cup part before coloring. Use a pen knife to carve out the shape and stick it on the lampshade. Pay attention when spraying the transparent red — because the transparent red has weak hiding power, the proportion of diluent can be less when diluting. Use thin spraying and multiple layers to slowly attach the paint particles to the parts, which can prevent paint from penetrating into the masking tape, causing paint leakage.
Exhibit
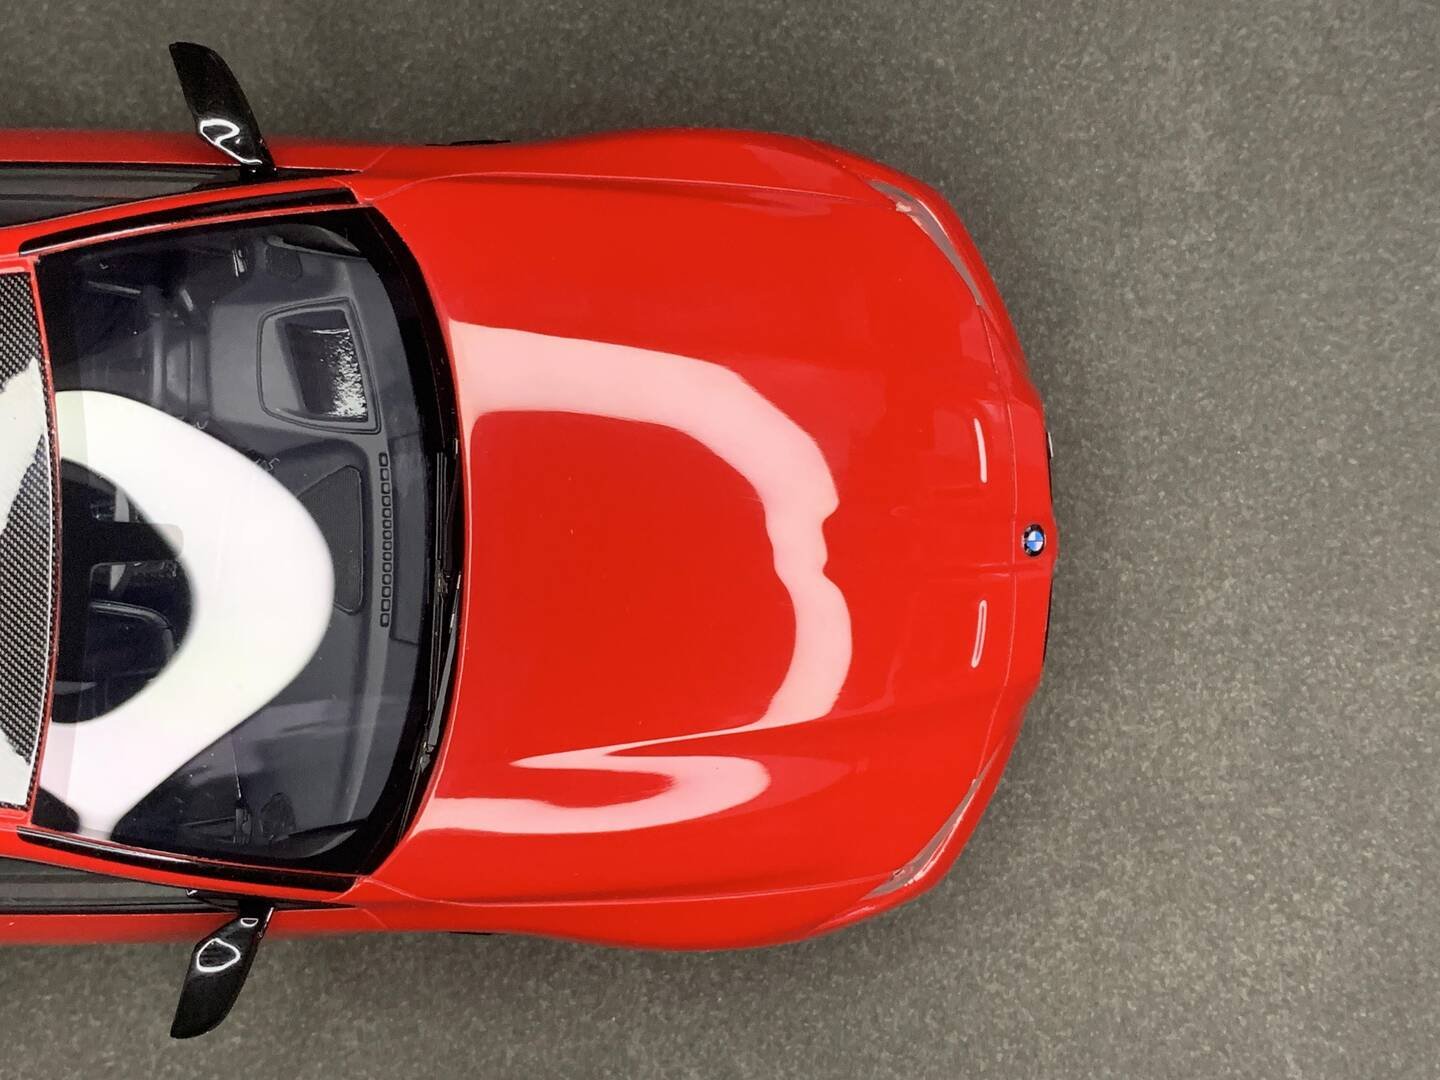
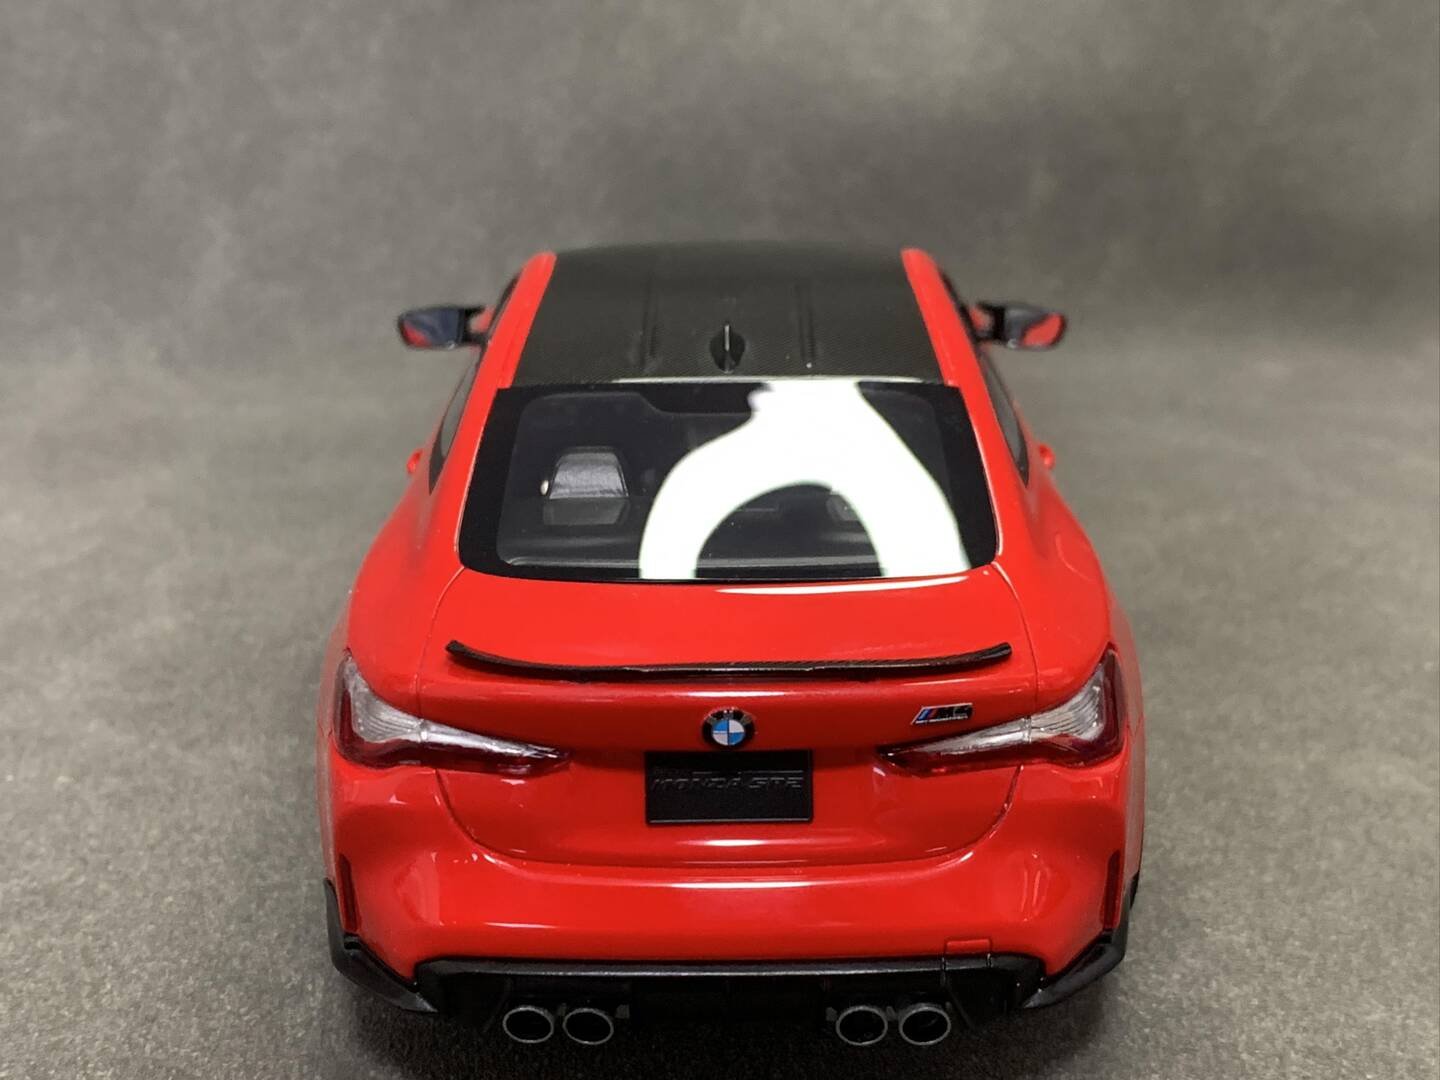
With all components assembled, painted, and detailed, the BMW M4 G82 build is now complete. The final model showcases the precision of AlphaModel's molding combined with careful craftsmanship — from the deep engraved body lines to the transparent red taillights, the ultra-thin PE windshield, and the finely detailed engine visible through the rear cover window.
End of build guide