
 Advanced Creators
Ferrari SF-23 (2023) Build Feature (Anthony Ricco / Model Mercenary) — Part 1: The Car & Parts Check
Alpha Model AM03-0011 · Build by Anthony Ricco (Model Mercenary)
About the Real Car
The Ferrari SF-23 was Scuderia Ferrari's challenger for the 2023 Formula 1 World Championship, raced by Charles Leclerc (#16) and Carlos Sainz (#55). An evolution of the 2022 F1-75, the SF-23 kept the famous rosso corsa red and added fresh black and white graphic elements, with the team fighting at the front on circuits that suited its package — Sainz took a memorable victory in Singapore that season.
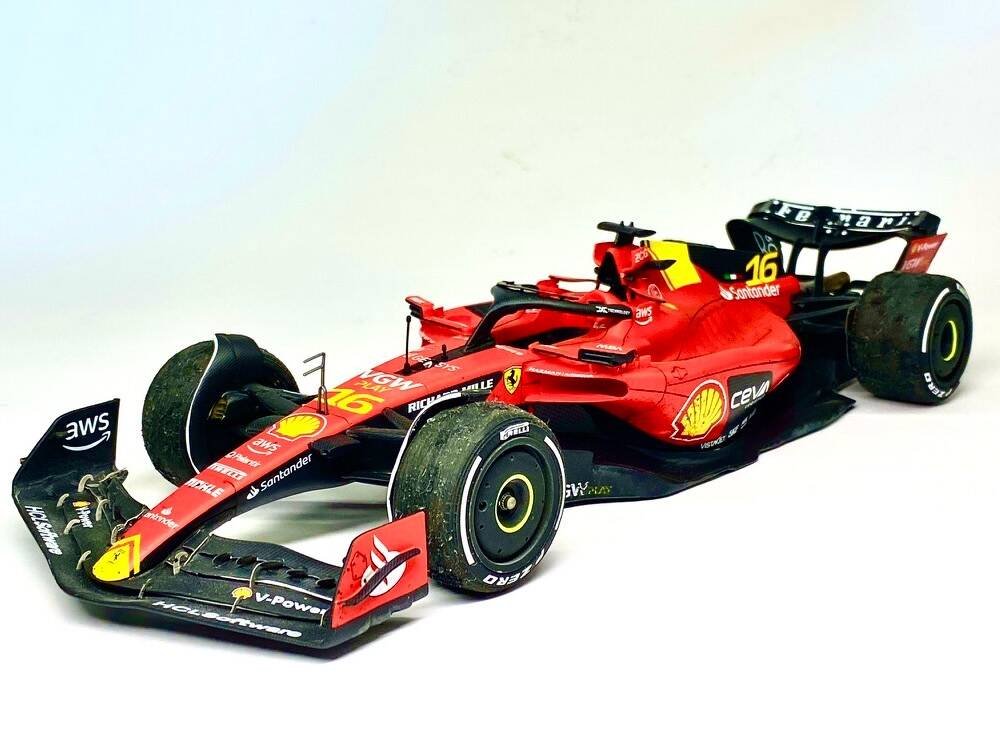
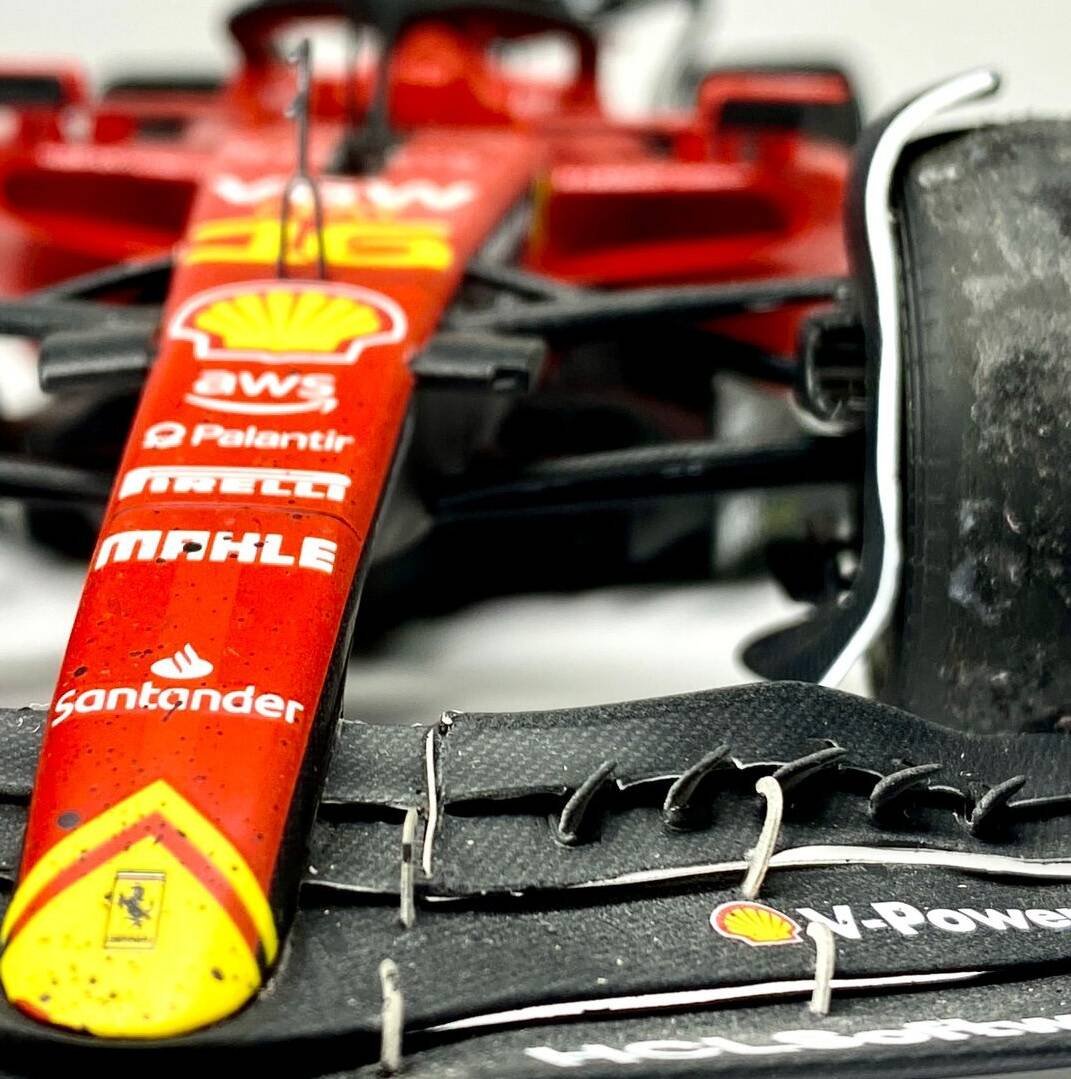
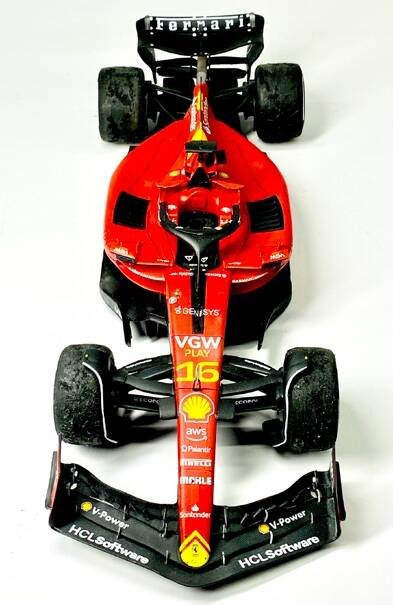
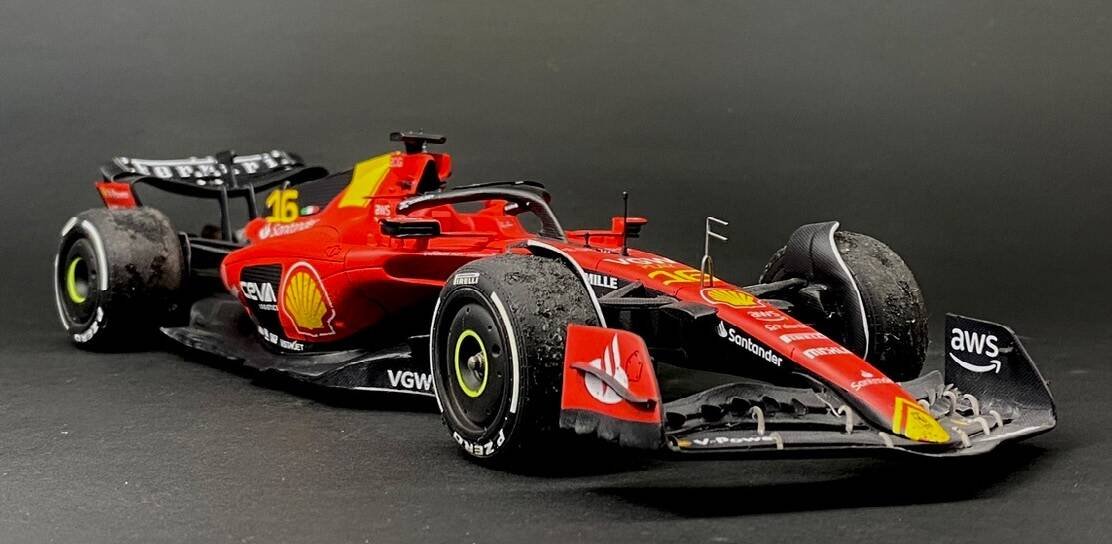
For the Italian Grand Prix at Monza, Ferrari ran a special celebratory version of the livery with striking yellow accents on the nose, engine cover and wings. This build represents that Monza car as Charles Leclerc's #16 — and, in a deliberate twist, finishes it as a post-race weathered car, as though the driver has just climbed out after a hard afternoon of racing.
About This Build
This feature follows Anthony Ricco (Model Mercenary) building the Alpha Model AM03-0011 Ferrari SF-23, a 1/20 scale full detail resin kit. The manual covers ten stages: parts check, washing, adjustments, priming, painting, interior, decals, detailing, weathering and the finished build.
| Kit | Alpha Model AM03-0011 — Ferrari F1 SF-23 |
| Scale | 1/20 full detail kit |
| Subject | 2023 Scuderia Ferrari SF-23, #16 Charles Leclerc, Italian GP (Monza) yellow-accent livery |
| Materials | Resin parts, photo-etched frets, 3D printed parts, rubber tyres, clear parts |
| Decals | 4 large carbon fibre sheets + 2 logo/extras sheets; Leclerc #16 or Sainz #55 options |
| Finish | Post-race weathered presentation |
Step 1: Parts Check
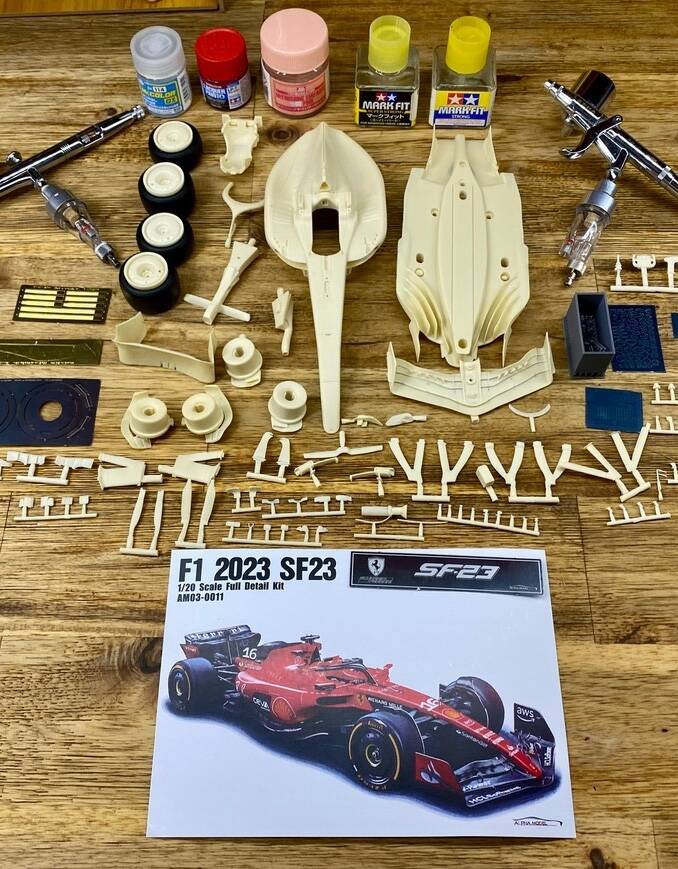
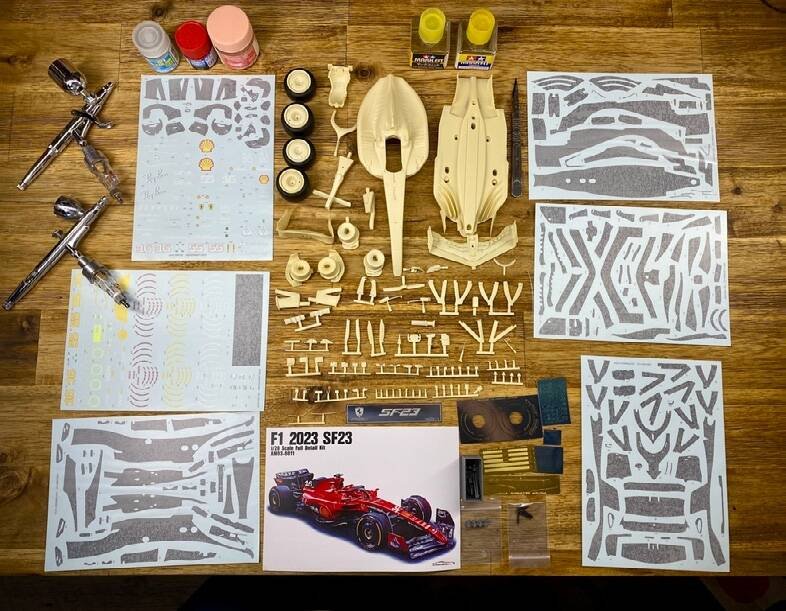
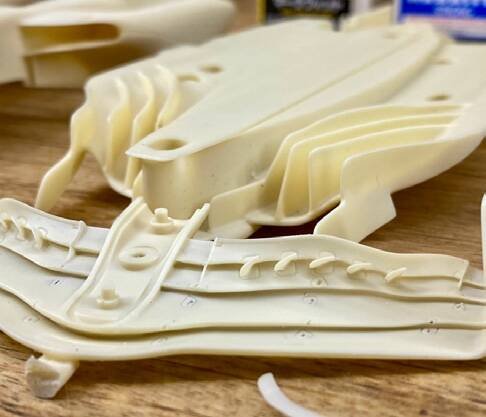
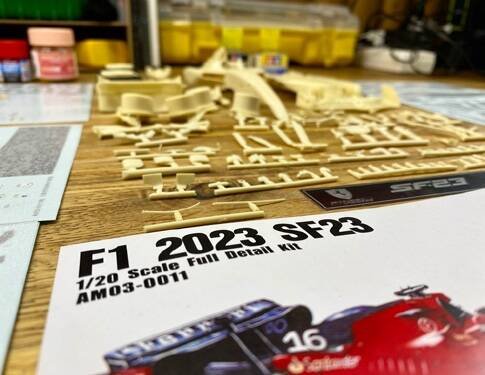
One of the best moments of any Alpha Model kit is opening the box — and this one does not disappoint. The resin parts are beautifully moulded, the photo-etched frets are crisp and carefully protected, and the kit also includes some very elegantly made 3D printed components.
The decal inventory is remarkable: four large sheets of carbon fibre decal plus two sheets of logos and extras. The sheet even offers the option to build the Italian GP car with its fantastic yellow highlights — which is exactly the direction chosen here. You can also choose between Charles Leclerc and Carlos Sainz; this build is the #16 Leclerc car.
Pre-build checklist
- Check all parts are present and accounted for.
- Inspect the photo-etched frets and decal sheets for bends, damage or stains.
- Look carefully at the detail — and take a moment to enjoy just how much of it there is.
Next: Part 2 — Cleanup, Adjustments & Priming
Advanced Creators
Ferrari SF-23 (2023) Build Feature (Anthony Ricco / Model Mercenary) — Part 2: Cleanup, Adjustments & Priming
Alpha Model AM03-0011 · Build by Anthony Ricco (Model Mercenary)
Step 2: The Washbay
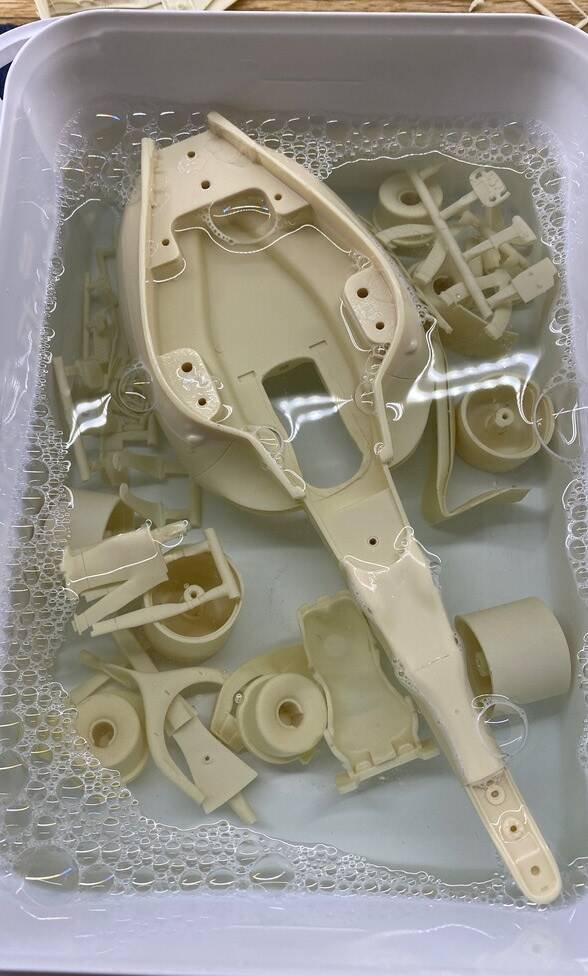
When most resin kits are produced, the moulds are treated with a non-stick mould release agent — and any residue left on the parts can be devastating to your paint work, causing fish-eyes and poor adhesion. The cure is simple: give everything a proper bath before any paint comes near it.
All the parts go into a bucket of warm water with ordinary dishwashing liquid to cut through the grease. After soaking for about 30 minutes, each part is taken out, scrubbed gently with an old toothbrush (definitely not one borrowed from the household), rinsed in clean water and set on a dish towel to air dry.
Cleanup checklist
- All parts soaked and cleaned in warm soapy water.
- Scrubbed gently with a toothbrush, rinsed and left to dry.
Step 3: Adjustments — Opening the Wing Slats
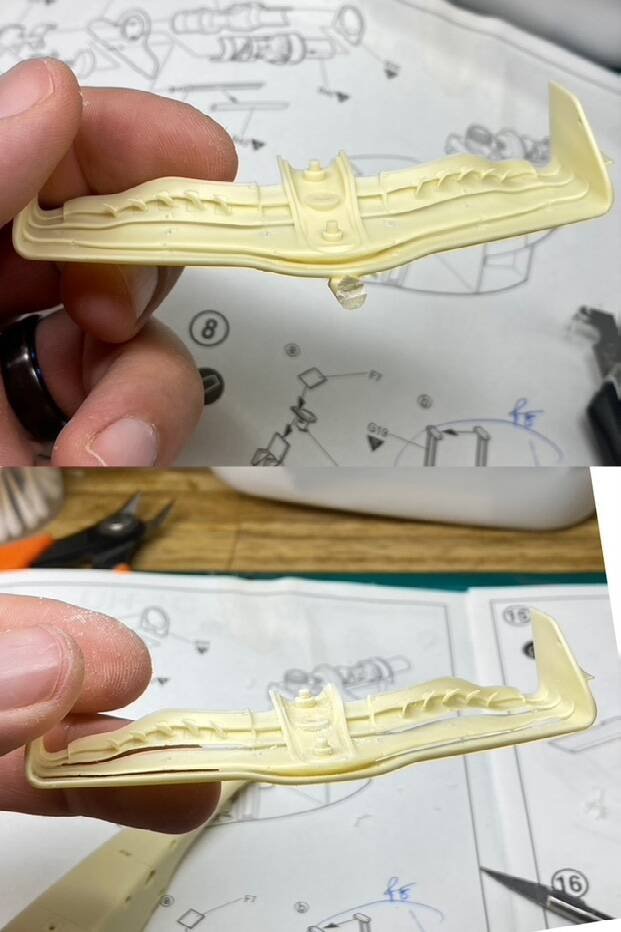
The rear wing arrives with closed slats, moulded shut simply because the real openings are so tiny. Since an open slat looks far more convincing on a finished F1 car, this build opens them up by hand. The resin is already extremely thin here, so it takes patience and very gentle work.
The process starts by scribing along each gap with a Tamiya scriber to establish a clean line, then carefully widening it with a sharp hobby knife. Once the opening is the right size, a narrow strip of sandpaper is slid through and stroked up and down a few times to smooth the edges, then the part is flipped and the other side is done the same way. The key is always supporting the thin resin so it does not snap.
Step 4: Priming
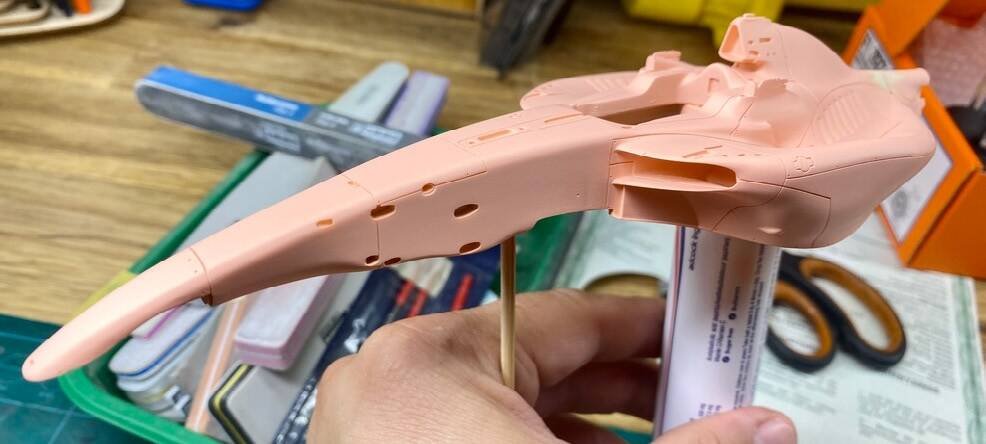
Priming is a critical step on resin kits — especially on the extremely smooth surfaces Alpha Model achieves. A primer gives the paint something to grip, evens out the finish and even enhances the final colour.
Before priming, every part is lightly gone over with a very fine 3000-grit sanding sponge. No pressure at all — just a soft, even rub to give the paint a better key.
Because the SF-23's main colour is a bright red, this build uses Mr. Surfacer 1500 Pink as the base layer: red over a pink primer really pops and shows off the brightness of the topcoat. The spraying routine is 3–4 light mist coats followed by one final wet coat, with about 10 minutes between coats. It is normal to still see the resin colour through the first 2–3 layers; coverage builds up as the layers stack. The final wet coat should look shiny and wet, but not so heavy that it runs.
Building the primer in layers like this also means small imperfections can be sanded and polished back without burning through to the resin. Once cured, the parts rest on foam inside a sealed plastic container for a few days, away from dust, while work moves on to other sub-assemblies.
| Surface prep | 3000-grit sanding sponge, very light pass |
| Primer (red body parts) | Mr. Surfacer 1500 Pink |
| Primer (carbon fibre parts) | Mr. Surfacer 1500 Black + Mr. Levelling Thinner |
| Spray schedule | 3–4 mist coats + 1 wet coat, ~10 minutes between coats |
| Cure time | Several days in a sealed, dust-free container |
Next: Part 3 — Painting Red & Carbon Black
Advanced Creators
Ferrari SF-23 (2023) Build Feature (Anthony Ricco / Model Mercenary) — Part 3: Painting Red & Carbon Black
Alpha Model AM03-0011 · Build by Anthony Ricco (Model Mercenary)
Step 5: Painting
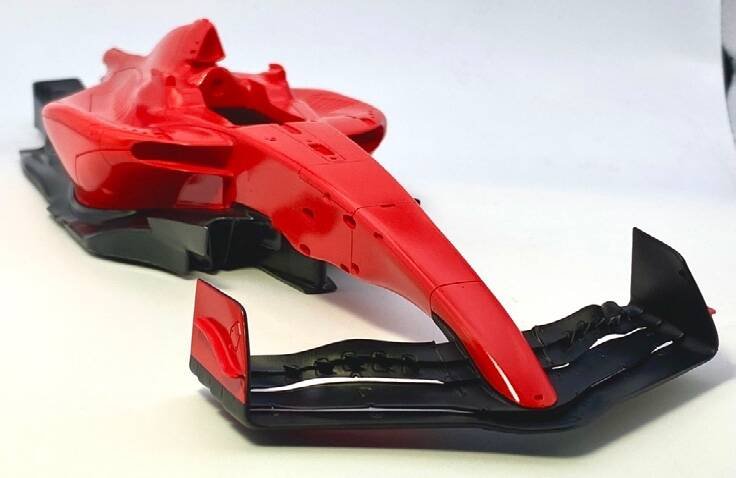
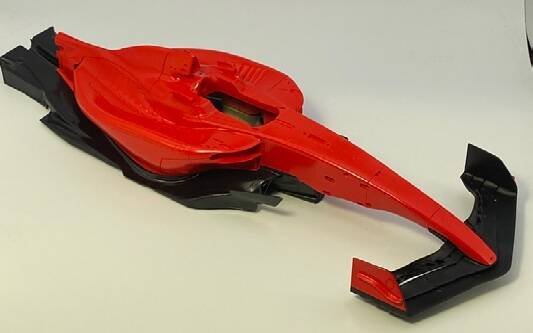
Painting the SF-23 is unusually easy thanks to the kit's thoughtful engineering: the part separation is done so well that very little masking is needed — in this build, masking was only required on the front and rear wings. Many parts are still irregular in shape, so the colour is built up with many light coats in order to reach every nook and cranny.
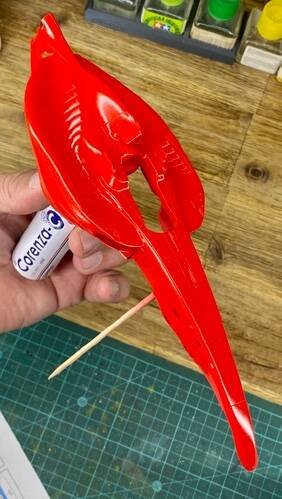
The main red: Tamiya LP-7 Pure Red
The SF-23's main colour is a nice, bright Ferrari red, and Tamiya LP-7 Pure Red is an excellent match straight out of the bottle. Sprayed over the pink Mr. Surfacer base, the red glows with exactly the vibrancy of the real car. Before painting, the instruction diagrams and good reference photos should be checked carefully to sort which parts are red and which parts will be covered in carbon fibre decal.
Painting the carbon fibre parts black
The SF-23 is packed with carbon fibre parts, and all of them are painted black before the carbon decals go on. The trick here is that a black base is forgiving: if a decal edge is not placed perfectly, the join disappears against the black underneath. The parts are primed with Mr. Surfacer 1500 Black thinned with Mr. Levelling Thinner, which flows out into a beautifully smooth surface — smooth enough that no clear coat is needed before the decals are applied. If you skip the clear coat this way, just allow a few days for the primer to cure completely first.
| Main colour | Tamiya LP-7 Pure Red |
| Carbon base | Mr. Surfacer 1500 Black thinned with Mr. Levelling Thinner |
| Masking | Front and rear wings only |
| Method | Many light coats to cover irregular shapes; several days cure if decalling directly onto primer |
Painting checklist
- Make sure body and primer are dust-free and smooth.
- Spray in a dust-free area; wipe the kit with an anti-static brush and a tack cloth.
- Always use protective equipment when spraying.
- Leave the paint to cure properly before handling.
- Sand out imperfections with the lightest grit you can.
Next: Part 4 — Interior, Decals & Detailing
Advanced Creators
Ferrari SF-23 (2023) Build Feature (Anthony Ricco / Model Mercenary) — Part 4: Interior, Decals & Detailing
Alpha Model AM03-0011 · Build by Anthony Ricco (Model Mercenary)
Step 6: Interior — Seats & Steering Wheel
The seat is supplied with a full set of beautifully replicated details — all the buckles, loops and seatbelt hardware are included in the kit. With so many tiny photo-etched and 3D printed parts making up the harness, the finished cockpit is a detailed place in its own right.
Because this build is a post-race version, the belts are deliberately left loose and slightly thrown around, as though the driver has just climbed out and unclipped himself after the chequered flag.
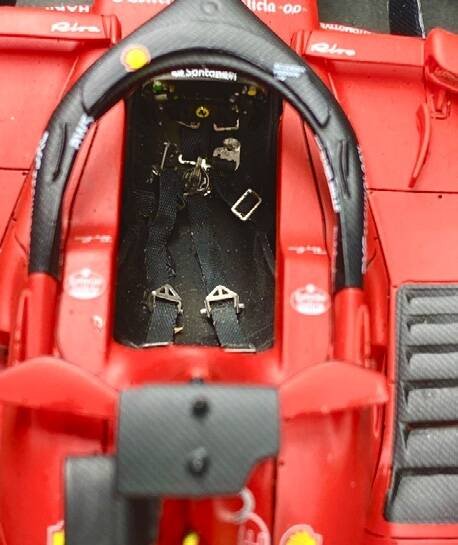
The one area the kit could be stronger is the steering wheel. Real F1 wheels are incredibly colourful, but the decal sheet does not include the coloured rings around the individual buttons. Hand-painting them did not look convincing, so here the wheel is kept plain with only a few button colours picked out — and rather than displaying it on the nose as some builders do, it is left installed in the cockpit. An aftermarket steering wheel set would be the natural upgrade.
Step 7: Decals
This kit is all about the decals — realistically, about 60% of the build time goes into them. Fortunately, the Alpha Model decals are incredible quality: thin but remarkably tough, they are genuinely hard to tear even when you are working them hard over complex curves.
All parts that are about to receive decals are first primed with Mr. Surfacer 1500 Black, so any slight misalignment is hidden against the dark background. The decals themselves are applied with plain water over the smooth painted finish — no setting solution is needed on flat areas. Where decals sit over raised detail (louvres, panel breaks, wing fences), a little Tamiya Mark Fit Strong helps them snuggle down, but it is not used everywhere.
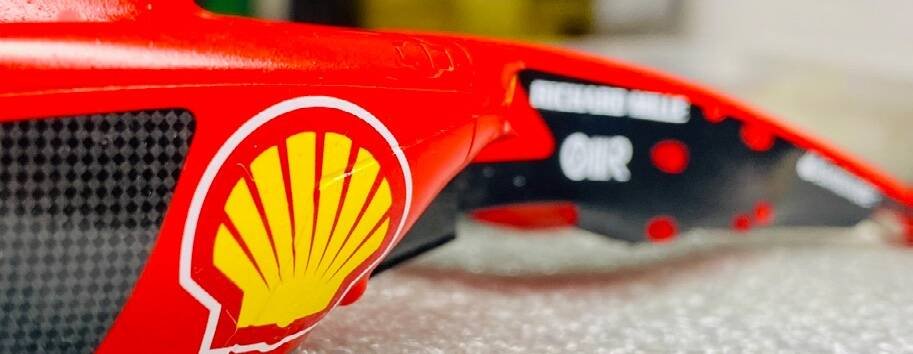
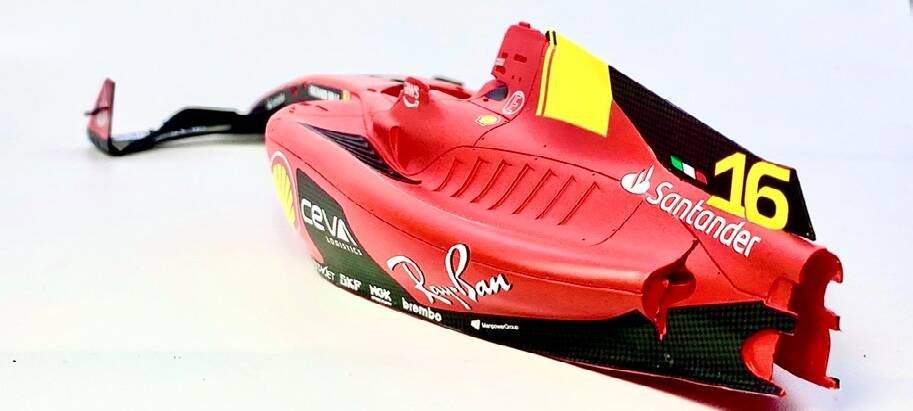
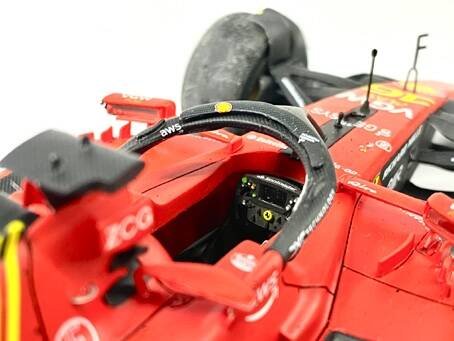
It really starts to look like a racing car once the sponsor logos begin going on. The important discipline is to keep checking reference photos constantly — it is easy to misplace a logo when the decals are this small and numerous.
Step 8: Detailing
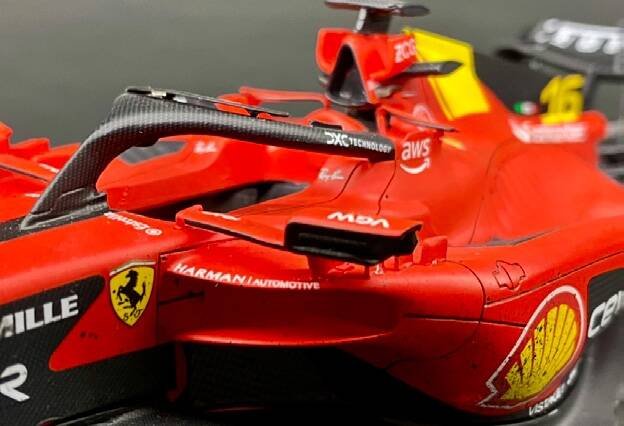
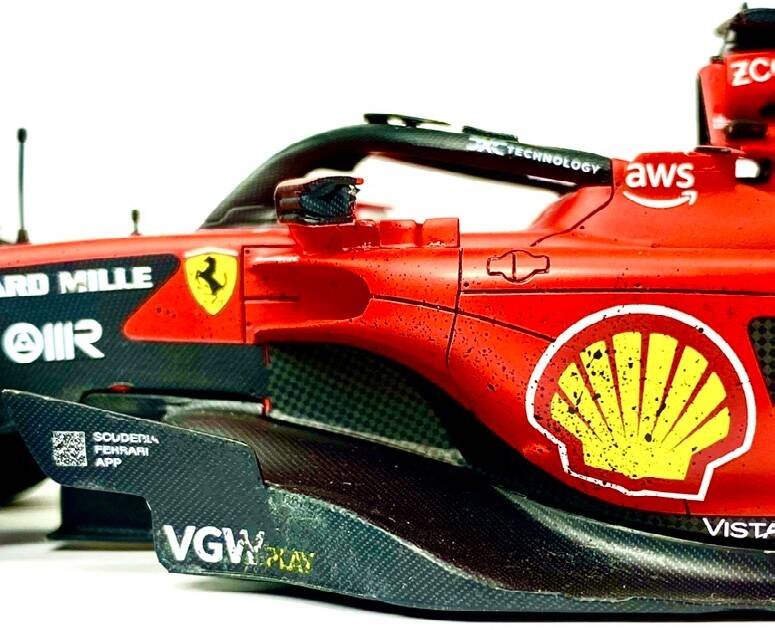
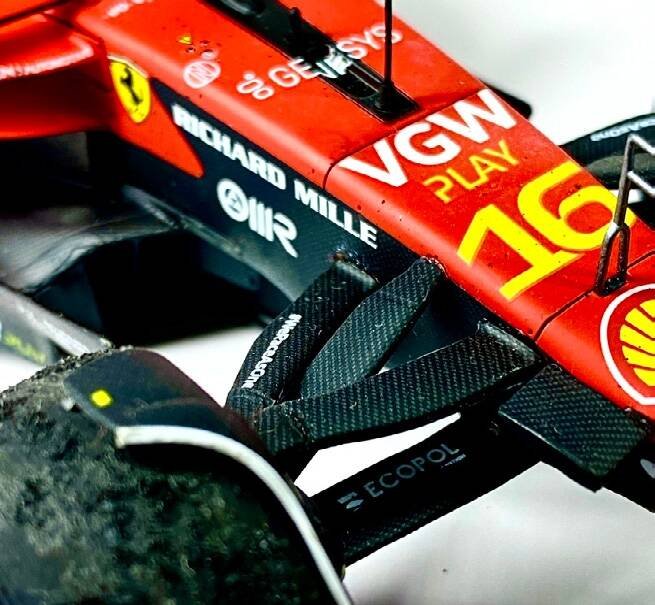
This kit is packed with fantastic detail — from the tiny DRS and wing-adjustment levers to nearly every aerodynamic flick and part that existed on the real car, plus the wiring that runs along the side of the monocoque supporting the floor. It is one of the areas where Alpha Model really shows off.
The rule for fitting these minute parts is patience and good reference photos — this is the stage where all your earlier hard work can be undone in a second. The assembly trick is to put a dot of CA glue on one mating surface and a dot of accelerant on the other, so the parts lock together instantly instead of sliding around while the glue tacks.
Next: Part 5 — Weathering & the Finished Build
Advanced Creators
Ferrari SF-23 (2023) Build Feature (Anthony Ricco / Model Mercenary) — Part 5: Weathering & the Finished Build
Alpha Model AM03-0011 · Build by Anthony Ricco (Model Mercenary)
Step 9: Weathering
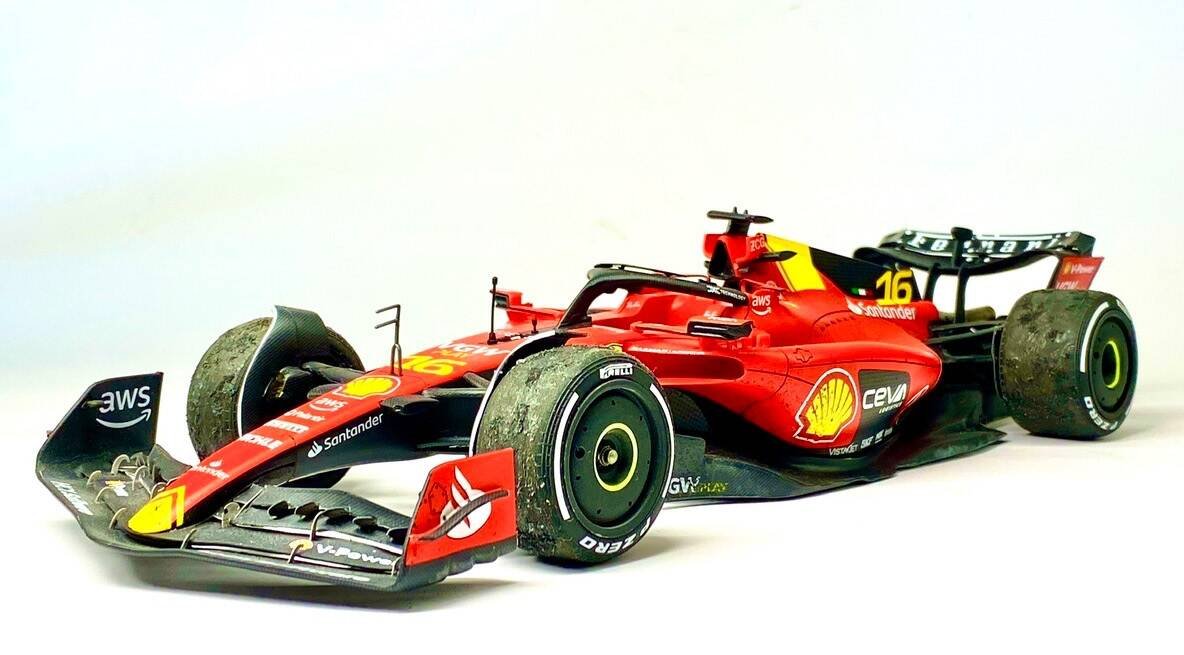
Weathering is not something you often hear about in car modelling — but it is the whole point of this build. Everyone with this kit will finish the same glossy Monza livery, so the decision here was to build a post-race version: a car that looks like it has just come in from a hard, fast afternoon on track.
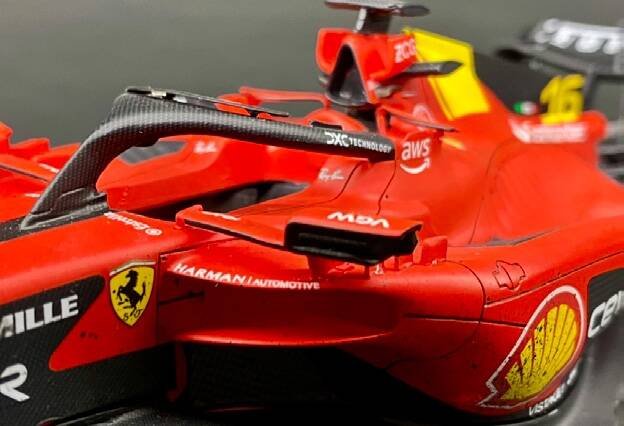
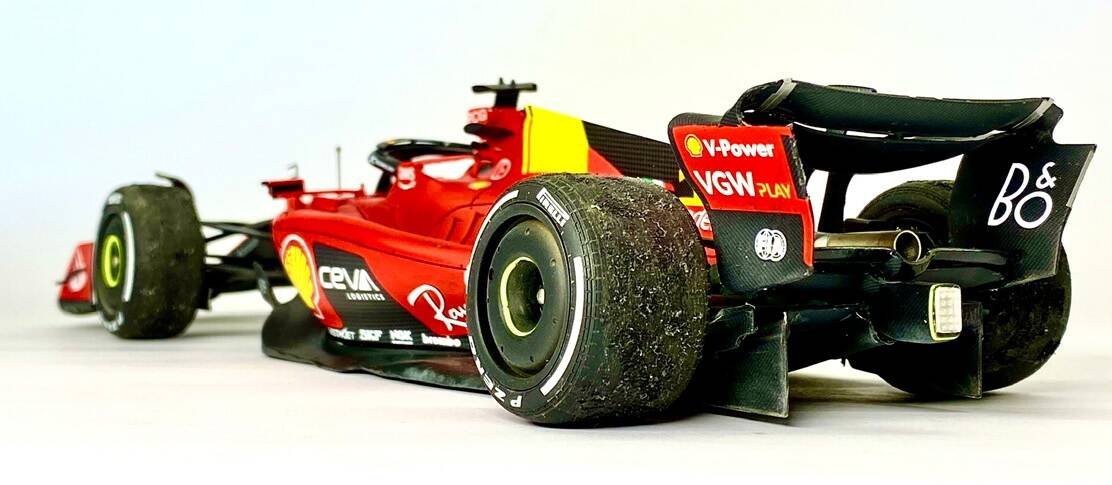
A close study of reference photos shows modern F1 cars do not actually get that dirty. What they do pick up is marbled rubber from degrading tyres, rubber and oil spots thrown from the track onto the bodywork, and a film of dust over the floor. That became the weathering target — subtle, believable, race-used rather than neglected.
Three-step weathering recipe
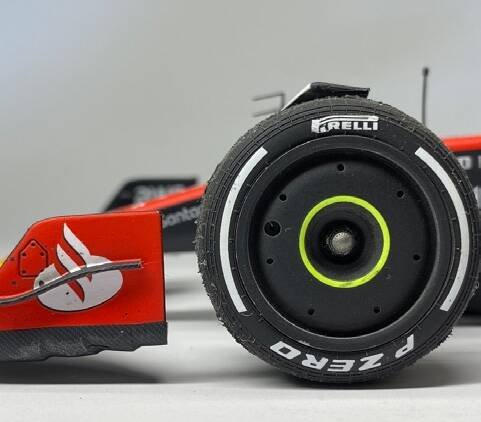
- Tyres: keep the rubber dust and shavings produced while sanding the tyre seams. Dab small patches of Mod Podge Matte (a white glue that dries matte) randomly over the tread and sidewalls, then sprinkle the saved rubber particles onto the wet glue to simulate picked-up marbles.
- Bodywork spots: load a small amount of Tamiya Rubber Black onto a firm brush and use a toothpick to flick specks onto the car — concentrated under the air ducts, behind the front wheels and across the nose. Check reference photos to see exactly where the real car collects it.
- Dust: grind a light brown/sand-coloured chalk pastel to powder and brush it lightly onto the floor plank and the other low areas visible in the references.
Step 10: The Finished Build
The finished SF-23 is everything a Monza special should be — Tamiya LP-7 Pure Red glowing over the pink primer base, four sheets of seamless carbon fibre decal breaking up the floor and wings, and the bright yellow #16 accents on nose and engine cover. Over it all sits a light, well-observed layer of race wear: rubbered tyres, speckled sidepods and dusty floor edges. The loose harness inside completes the story: Leclerc has just parked it after the flag.
Key products used
| Primer | Mr. Surfacer 1500 Pink (body) / Black (carbon parts), Mr. Levelling Thinner |
| Main colour | Tamiya LP-7 Pure Red |
| Decal solution | Tamiya Mark Fit Strong (over raised detail only) |
| Weathering | Mod Podge Matte + saved tyre rubber; Tamiya Rubber Black; sand-coloured chalk pastel |
| Adhesives | CA glue with accelerator for photo-etched and 3D printed details |
A huge thank-you to Alpha Model for the opportunity to build this incredible kit. Build and manual by Anthony Ricco — Model Mercenary.
End of feature — thank you for reading. Alpha Model AM03-0011, Ferrari SF-23, 1/20 Scale Full Detail Kit.